Are you looking to cancel or delete multiple friend requests at once on Facebook – or perhaps even all of them?
Once you know where to look, doing this is quick and simple.
So, in this article I’ll be showing you how you can cancel all sent friend requests at once – first on the computer, then through the Facebook app as well.
Let’s get started!
How To View And Cancel All Sent Friend Requests On Desktop
Although it’s possible to cancel all sent friend requests both on your computer as well as on your phone, it’s quicker on the computer.
So, let’s first look over how you can do it on your PC, Mac, or Linux computer first!
1. Click On ‘Friends’
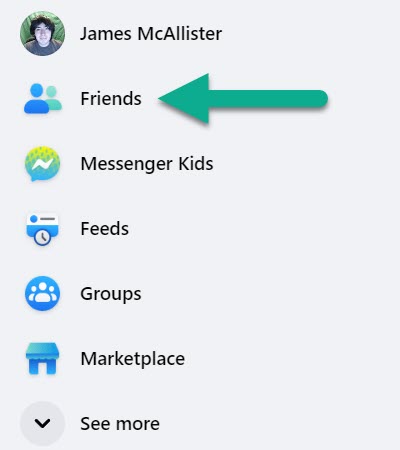
First, open up an internet browser, and visit Facebook’s website.
On the left-hand side of the screen, you should see a menu.
Click on the option that says ‘Friends’, which will open a new page.
2. Click On ‘Friend Requests’
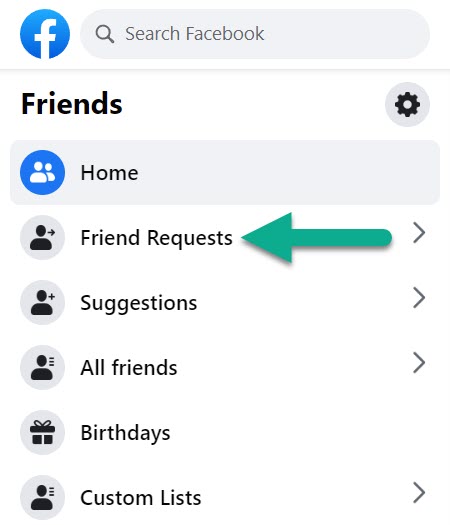
On the new page, you’ll see a list of your current friend requests, along with people that you may know.
What you won’t find here is the friend requests that you’ve sent!
So, on the left-hand menu, click on the button that says ‘Friend Requests’ and then proceed to the next step.
3. Click ‘View Sent Requests’

Here, you’ll find all of the friend requests that you’ve received from others.
If you wish, you can click on their name to preview their profile. This is a good opportunity to browse through the list, to see if there were any important friend requests you missed!
Anyway, we’re interested in the friend requests you’ve sent. To see these, click on the button that says ‘View sent requests.’ It should be located at the top of the menu, underneath the number of friend requests that you’ve received.
4. Click ‘Cancel Request’
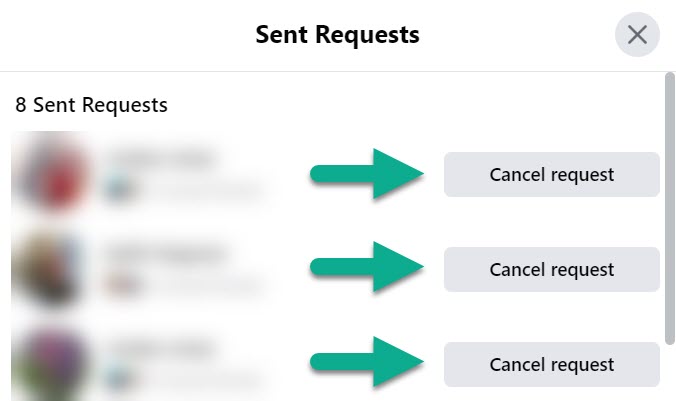
On this page, you’ll see a complete list of every friend request that you’ve sent!
You can quickly cancel them by clicking on the ‘Cancel request’ button next to each person’s name.
If you have a lot of friend requests that you’ve sent, I’ll also be sharing a script later on that will cancel them all automatically.
Otherwise, you can simply click the button to cancel your friend requests en masse!
How To View And Cancel All Sent Friend Requests On The Facebook Mobile App
It is also possible to cancel all of your sent requests through the Facebook app, though there are a few more steps involved.
Thankfully it’s still quite fast once you’ve reached the right place!
So, let’s look over how you can cancel friend requests in bulk through the Facebook app. I’ve tested that this is working both on the iPhone and Android versions of the app, so it should work regardless of the mobile device you’re using!
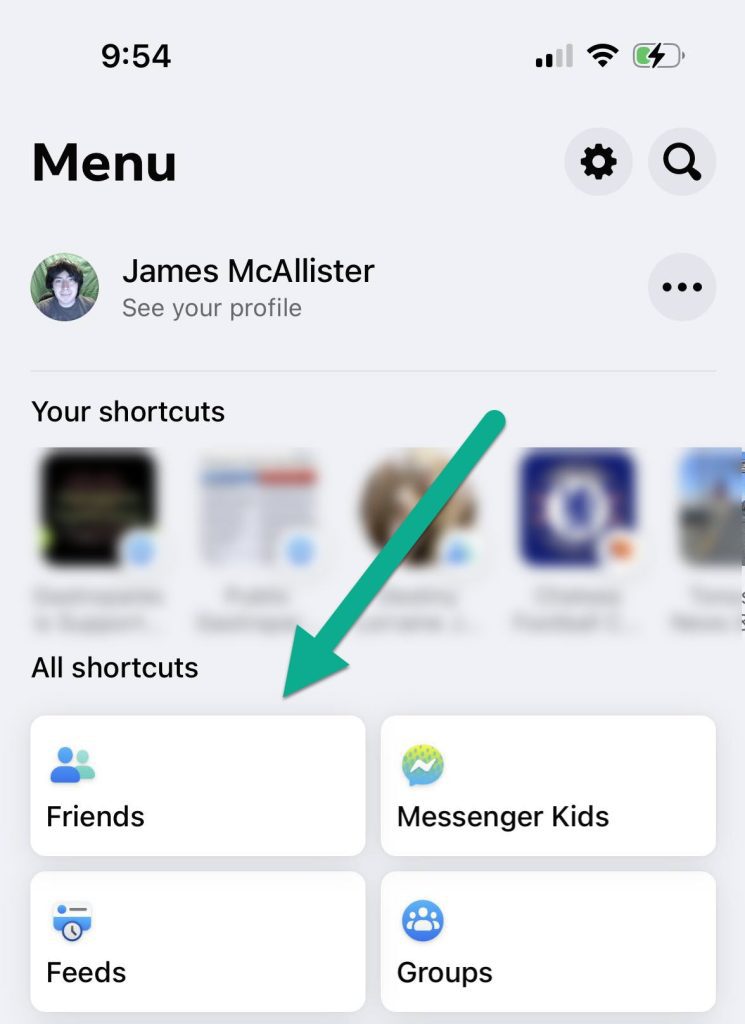
1. Tap On ‘Menu’
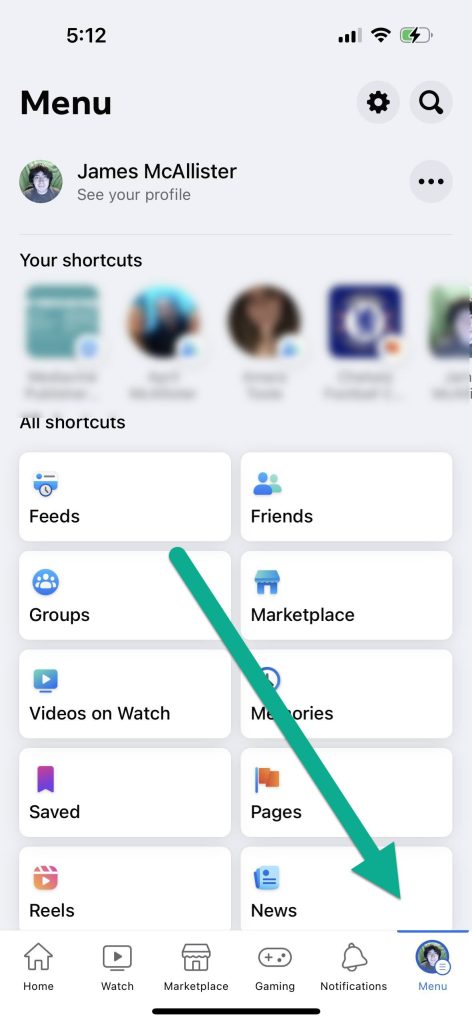
To start, you’ll need to visit the page with all of your shortcuts.
This can be reached by tapping on the ‘Menu’ button in the bottom navigation menu. This will always be located in the bottom-right corner.
Once it’s opened, it should pull open a page similar to the one pictured above. Note however that the order of your shortcuts may be different!
2. Tap On ‘Friends’
Once you’re on the menu, locate the shortcut labeled ‘Friends.’
Depending on the layout of your menu page, you may need to scroll down in order to find it.
Once you’ve located the Friends button, tap on it to open a new page.
3. Tap On ‘See All’
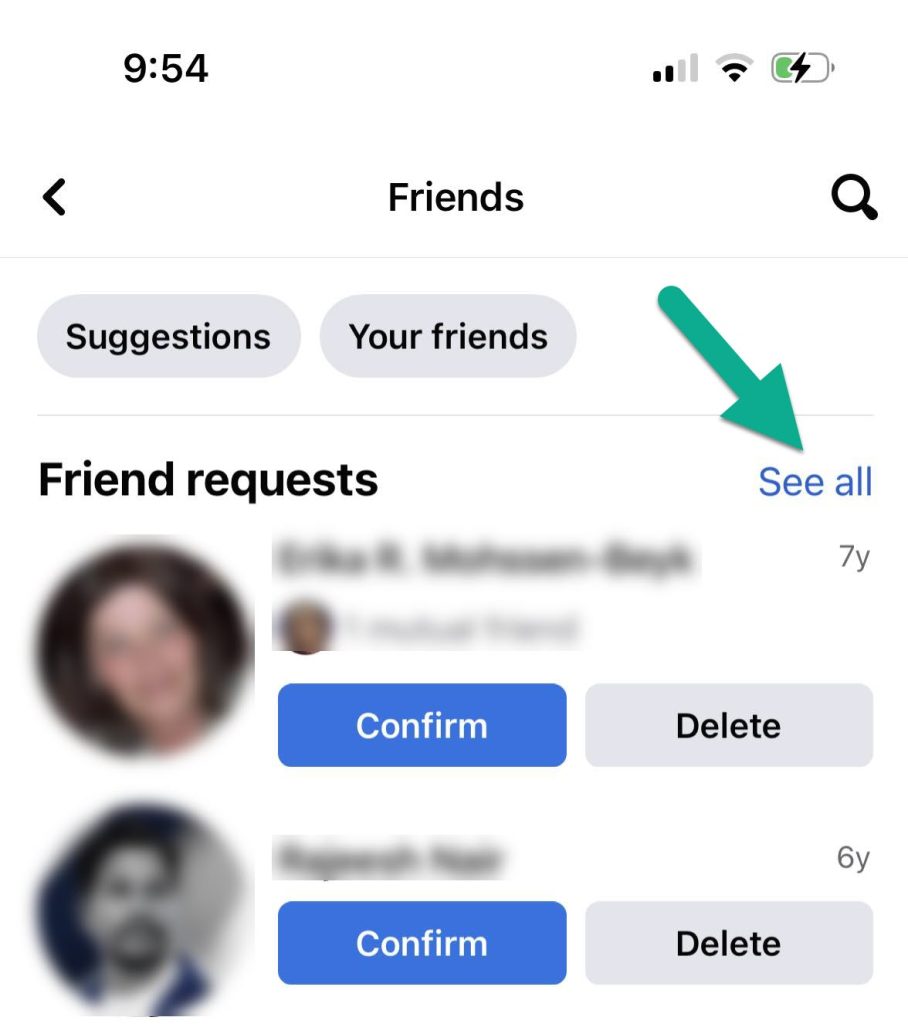
By default, the friends page will show the friend requests that Facebook suggests you look at first.
However, in order to reach the friend requests you’ve sent to others, you will first need to click on the blue text that says ‘See all.’
It should be located towards the top of the page, on the right-hand side.
4. Tap On The Icon With Three Horizontal Dots
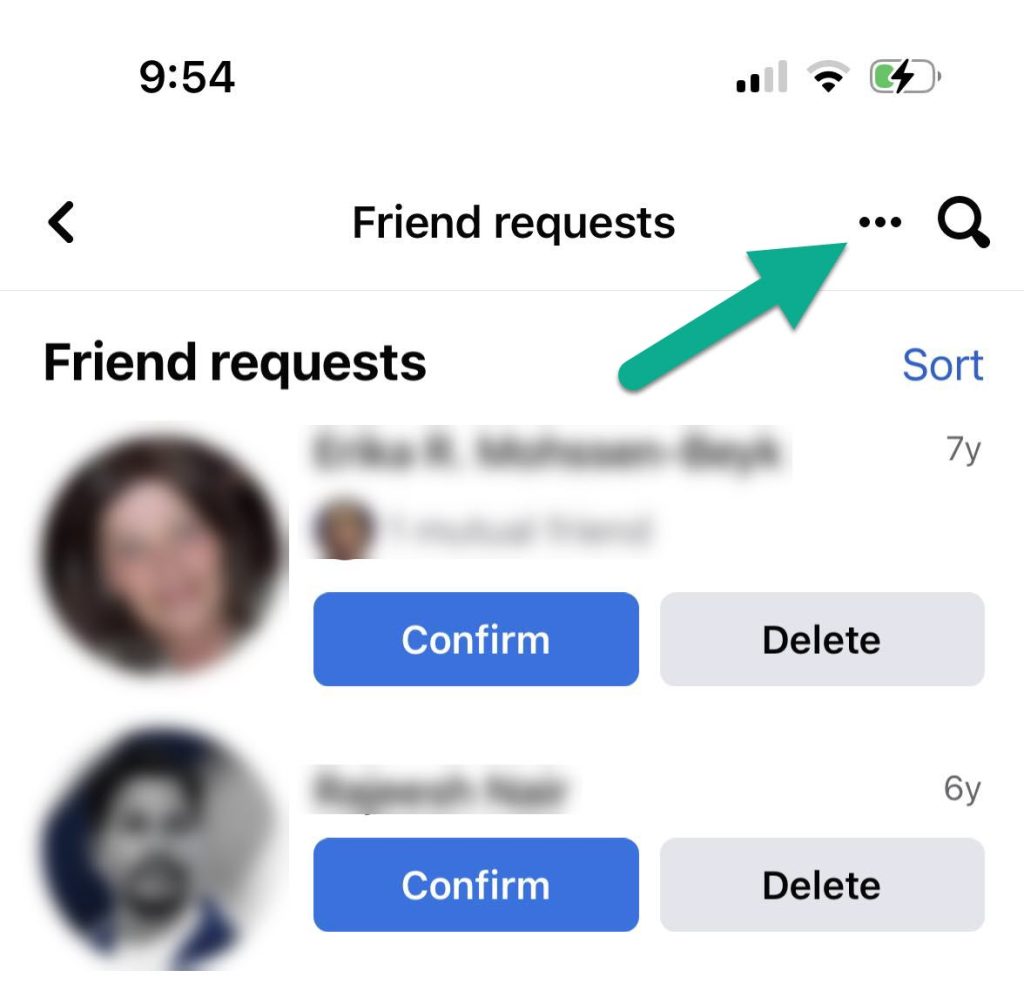
After clicking ‘See all’, you may have noticed that not much has changed – the same people may be appearing.
However, the UI will have changed a little bit.
There will now be an icon with three horizontal dots located in the top-right corner of the page. Tap on it to pull up additional options!
5. Tap On ‘View Sent Requests’

Once you’ve tapped the icon with three dots, a new menu will open at the bottom of your screen.
Tap on the new button that’s popped up that says ‘View sent requests’, which will finally show you the friend requests you’ve sent to other people.
Note that if you have a lot of friend requests that you’ve sent, it can take a few moments for the new page to load!
6. Tap ‘Cancel’ Next To Each Friend’s Name
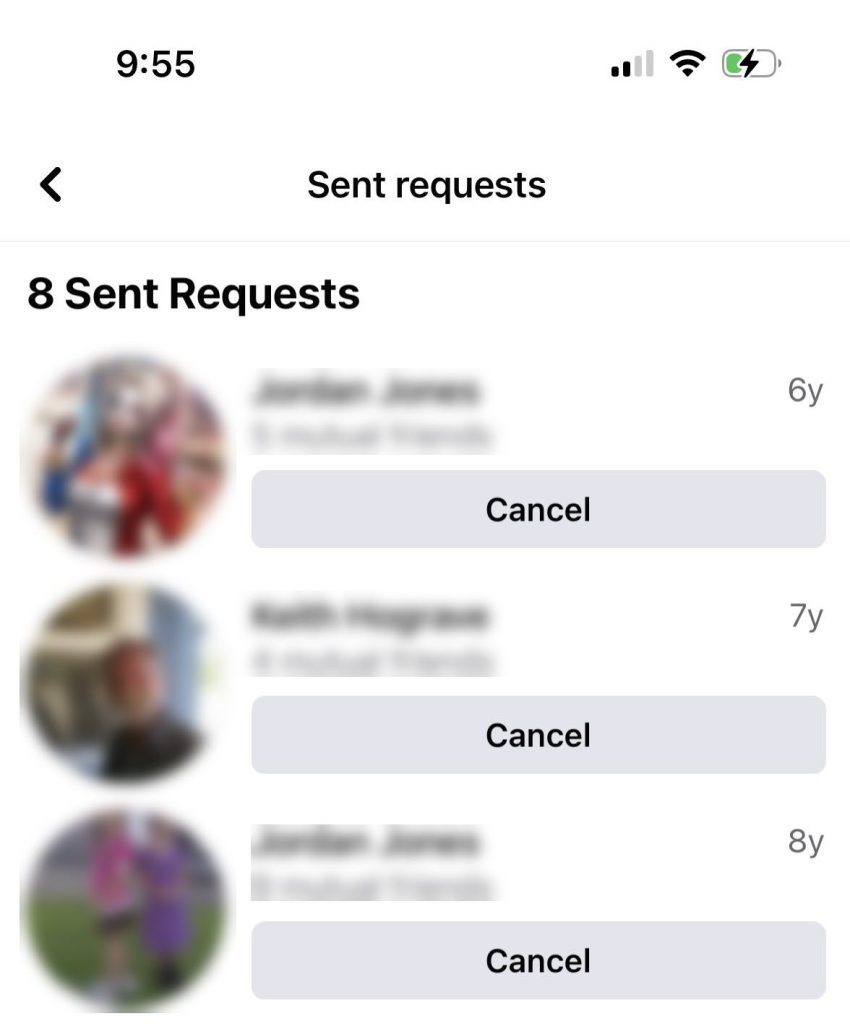
Finally, tap on the ‘Cancel’ button below each person’s name to cancel the friend request you’ve sent to them.
This can be done quite quickly, as everyone will be in an ordered list – starting with the friend requests you’ve sent most recently. So if you recently sent a few that you regret, these people should appear first.
Once you’ve cancelled every request you want to cancel, you’re done!
Too Many People? Remove Them Automatically With This Script!
If you have hundreds of friend requests or you just don’t want to bother cancelling each friend request manually, don’t worry!
There is a script you can use that will automatically cancel them for you, so you don’t have to click or tap the button yourself. However, this method only works on desktop, so you will need to be on your computer if you want this to work.
First, navigate to the page that shows your outgoing friend requests. Then on Google Chrome, right-click on the page, and click ‘Inspect’ on the menu that pops up.
Across the top of the box that pops up, you should see options like ‘Elements’, ‘Recorder’, and ‘Console’. Click on the tab that says ‘Console.’
Facebook may give you a warning telling you not to paste anything here, but this can be safely ignored. The script below simply finds the ‘Cancel request’ buttons on the page, and clicks on them automatically.
Anyhow, scroll to the bottom of the window, and paste the following code in:
javascript: var inputs = document.getElementsByClassName(‘_54k8 _52jg _56bs _26vk _2b4n _56bt’); for(var i=0; i != inputs.length; i++) { inputs[i].click(); }
Run the command, and the buttons should end up getting clicked automatically.
Pretty neat!
Conclusion
Once you know where to look, cancelling sent friend requests on Facebook is simple – even if you want to cancel all of them at once!
Typically, it’s easier to do on desktop since there are less steps involved, and you can use the above script to cancel all of them automatically. However, it’s pretty easy to delete them on mobile as well.
I hope that you’ve found this article helpful, and you’ve managed to cancel all of the friend requests you were hoping to cancel.
If you run into any issues, let me know via the comment form below and I’ll be happy to help.
Wishing you the best,
– James McAllister
