Did you know that there are likely a lot of messages you’ve been sent on Facebook, that are completely hidden away from you?
In fact, if you’ve never checked your spam folder before, you may find that there are hundreds of messages you were never told about!
Thankfully, viewing both your message requests, as well as your spam folder on Facebook is actually pretty easy.
In this article, I’ll show you step-by-step how to access these folders – both on the computer, as well as through the Messenger app on your phone. I’ll also talk a bit about what causes these messages to end up in each folder as well.
Let’s get started!
How To View Message Requests / Spam On Desktop
First, let’s look over how you can view these folders while using Facebook on your computer.
Step One: Tap On The Messages Icon
![]()
First things first, tap on the messages icon located at the top-right corner of your page.
This will pull up your list of current messages, as normal.
However, you will only see messages from people you’re friends with, or recent message requests (rather than all of them) at this point.
Step Two: Click On The Icon With Three Dots
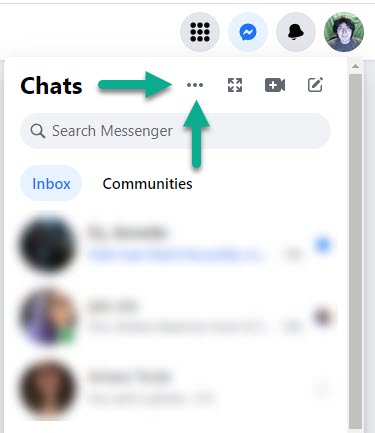
Once you’ve pulled up your list of messages, click on the icon with three dots at the top of your messages list.
This will pull up an additional sub-menu, that will allow you to access additional options.
Once you’ve pulled it up, move onto the next step!
Step Three: Click On ‘Message requests’
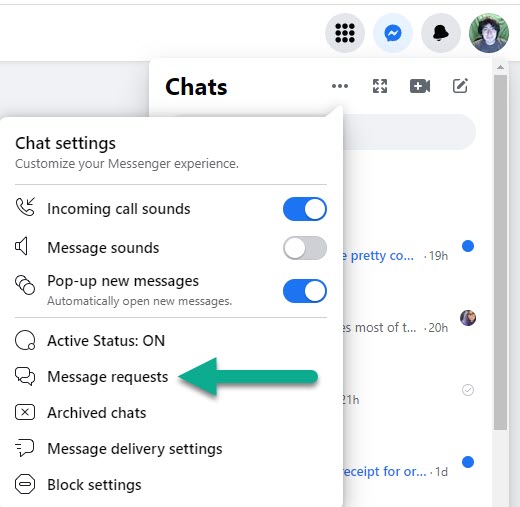
You’ll notice that there are a lot of different options when you pull up the chat settings – for example, giving you control over whether you appear online, or how you receive message notifications.
At this point however, there is only one button you need to find, called ‘Message requests.’
Click on this, to pull up your message requests folder.
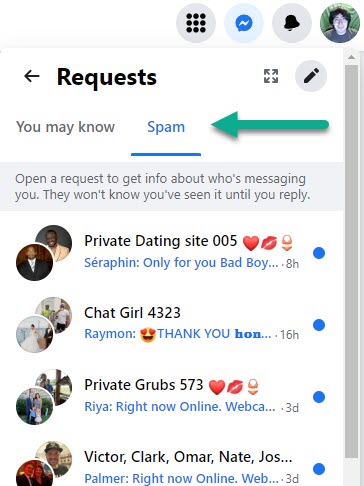
Step Four: Click On The Spam Folder
If you were only interested in your normal message requests, you can stop at the last step – Facebook will show you all of your normal message requests at this point.
However, if you are also interested in viewing your spam messages, you can switch from the ‘You may know’ tab, to the ‘Spam’ tab.
These messages will likely look quite a bit different, and Facebook is actually pretty good at identifying actual spam.
Still, if you’re bored or want to flip through them, here they are!
How To View Message Requests / Spam On The Messenger Mobile App
Now that we’ve covered how to view your spam folder and message requests folder on the computer, let’s now look over how you can do it through the Messenger app.
Thankfully, it’s just as simple! Note that the process is exactly the same, on both iPhone as well as on Android.
Step One: Open The Messenger App, And Navigate To The Main Page

First things first, open up the Messenger app. Note that you will need the Messenger app specifically, not the Facebook app you normally use to browse your news feed.
From there, navigate to the main chat page if you’re not there already.
This can be done by tapping the ‘Chats’ button in the bottom navigation menu.
Step Two: Tap On The Menu Icon In The Top-Left Corner
![]()
Next, tap on the menu icon in the top-left corner.
This icon looks like three horizontal lines, and is sometimes referred to as the ‘hamburger icon.’
When you tap on it, it will pull up a new menu with additional options.
Step Three: Tap On ‘Message Requests’
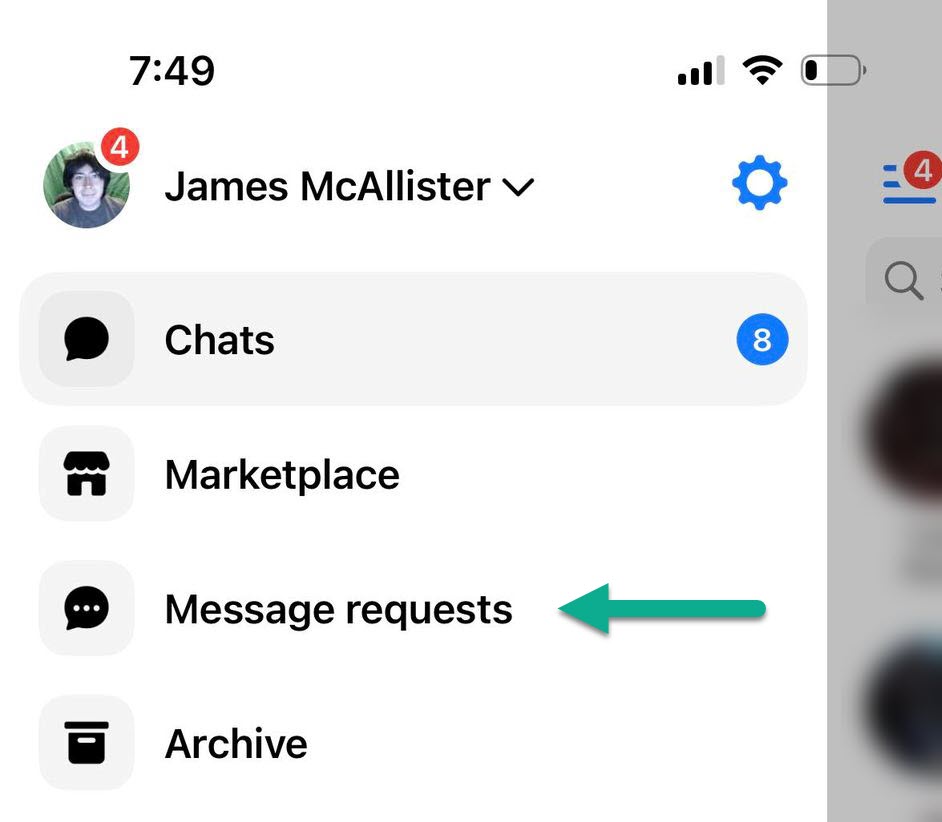
Once the new menu is open, you’ll see several different options, such as ‘Chats’, ‘Marketplace’, ‘Message requests’, and ‘Archive.’
To reach both your message requests and spam folder, you’ll want to tap on the icon labeled ‘Message requests.’
As you might expect, this will immediately switch you over from the ‘Chat’ folder with your regular friends, to the message requests that you’ve received!
Step Four: Tap On ‘Spam’
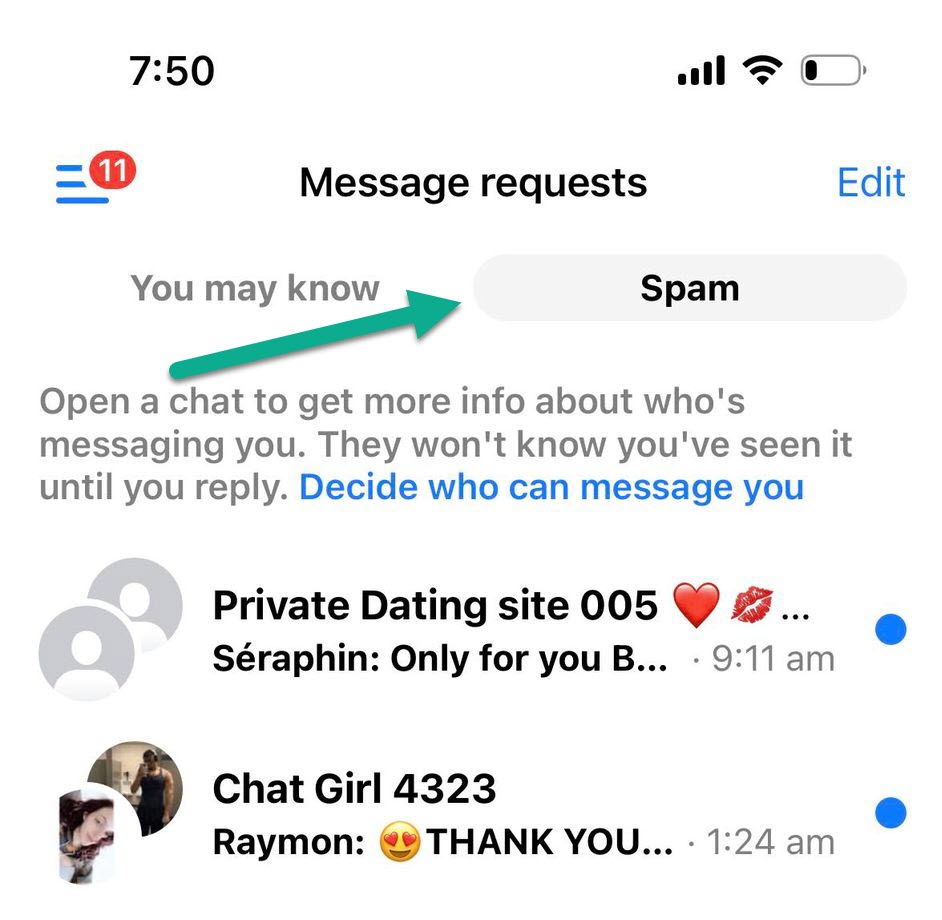
If you only cared about seeing your normal message requests, you can end at step three.
However, if you’d like to also see your spam messages, you can do so by tapping on the ‘Spam’ button located at the top of your screen.
This will immediately show you all messages that Facebook automatically moved to spam.
Of course, if you ever want to return to your regular message requests, simply tap on the ‘You may know’ button at the top!
Congratulations, you now know how to access your message requests and spam folder on Facebook!
What Causes Messages To End Up In These Folders?
So, now that we’ve gone over how you can view your message requests and your spam message on Facebook, you may be wondering – what even causes messages to end up in these folders in the first place?
For message requests, it’s pretty straight forward.
However, as long as Facebook doesn’t think that the message is spam, you should be able to see that you’ve been sent a message request, so you can choose whether to accept or ignore it. This is particularly useful if you use Facebook Marketplace, or if someone you might know is trying to get in contact with you.
Spam is handled a little differently, however.
Facebook doesn’t disclose exactly how they determine what causes a message to end up in spam, but there are a few obvious indicators. For example:
- If someone’s message contains keywords that are known for spam (for example, advertising language, adult themes, etc.)
- If someone messages you that has absolutely no connection to you – no mutual friends, no communities you’re both a part of, etc.
- If someone is messaging a lot of people at once.
- If someone is adding you to a group chat with a large amount of other people.
Since these are tactics spammers often use, messages with these qualities are likely to end up in Messenger’s spam folder.
Sadly, spam is still a huge problem on Facebook, so I personally believe that it’s a good thing that Facebook doesn’t notify us for every spam message that ends up there!
Conclusion
Once you know where to look, viewing your message requests, as well as your spam folder is easy.
Both folders can be accessed with just a few clicks or taps, regardless of the device you’re using Facebook on. So, periodically check them to ensure that you don’t miss anything important!
I hope that you’ve found this article to be helpful. If you have any questions or you’re having trouble accessing the folders, let me know via the comments form below and I’ll be happy to help.
Wishing you the best,
– James McAllister
