Once you’ve finished editing your Audacity project, it’s time to export the final file.
It’s important to understand that saving your Audacity project on its own, does not create a file that you can distribute and share with others.
In order to create a file that you can share and upload to your podcast host, Spotify, or other audio distribution platforms, you’ll have to do something called exporting.
Fortunately, this is all quite simple. Let’s look over the exporting process in Audacity.
How To Export Audio In Audacity
To export audio in Audacity, do the following:
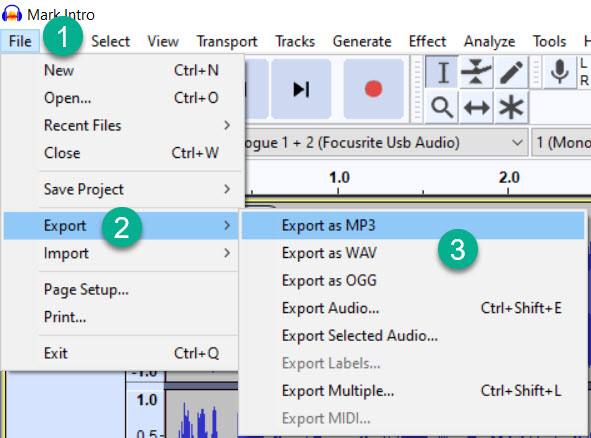
- Open the file menu.
- Hover over ‘Export’
- Select the option that applies to you.
You can see already that there are preset options for .Mp3, .Wav, and .Ogg files. If you need any of these, go ahead and select the option that is applicable to you.
Exporting Other Audio Formats
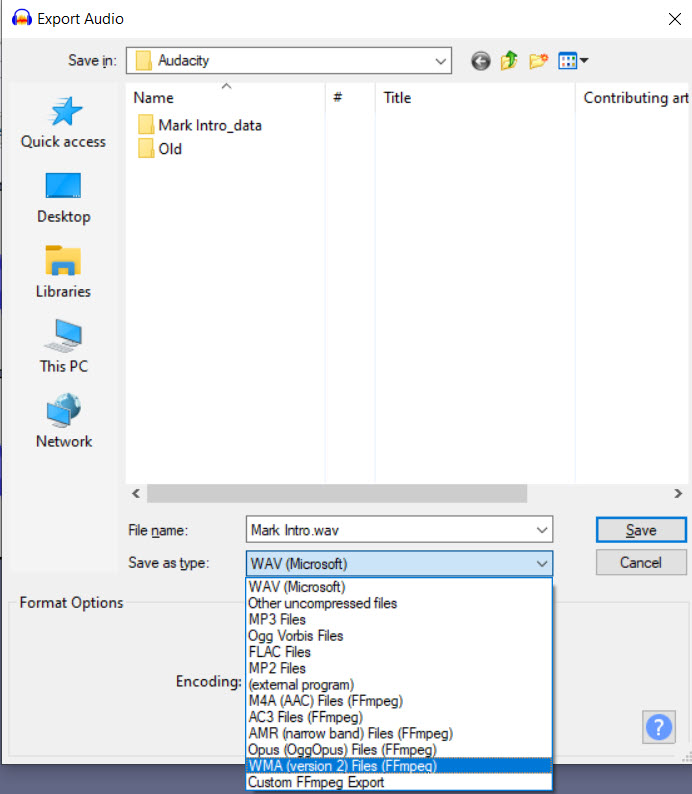
If you click the ‘Export Audio…’ option, you’ll be able to choose several more file formats as well, including FLAC, M4A, WMA, and several others! However, these may require you to install FFMpeg as noted in this article.
Simply click the drop-down menu next to ‘Save as type:’ and choose the file format that you need. We’ll get more into some of the advanced settings in a moment.
Which File Format Should You Export To?
For podcasters and content creators, the two file formats you’ll most commonly be working with are .wav and .mp3.
The key difference between these? .Mp3 is compressed, where .Wav is not.
What this means is that when you export .mp3 files, some of the unnecessary data is removed from the file.
This makes the file size significantly smaller, at the expense of a slight degradation of the audio quality.
.WAV vs. .MP3
If you’re uploading music, you’ll only ever want to use uncompressed formats like .WAV or FLAC. In music, small quality differences can matter a lot, and the difference between .MP3 and uncompressed formats becomes more apparent when playing music at very high volumes.
For content creators however, MP3 is usually the more desirable choice. Here’s why.
In spoken dialogue, the small quality degradation of Mp3 is practically unnoticeable by listeners.
What they will notice however, is if the audio takes a significantly long time to download, or ends up having to pause and buffer while listening.
Or even worse, ends up costing them a lot of money in data charges. If you have a global audience, it’s important to remember that they may not have unlimited internet, and each download costs money.
After all, podcast episodes or audiobooks tend to be quite long. This quickly adds up to massive file sizes.
For reference, 1 hour of 128kbps .MP3 audio is 57.6 megabytes. 1 hour of 32-bit .WAV is 1.27 gigabytes, or over 22x the size.
It is simply not worth creating a much larger file, for a quality difference that is unperceivable to most people.
Granted, you can create higher quality MP3s and lower quality .WAV files than the examples just mentioned, effectively reducing the difference between them, but I hope it illustrates an important point.
If You’re Going To Be Editing The File Further…
If you’re going to be making further edits to the file, you should always save in an uncompressed format like .WAV.
For years, my workflow had me editing audio in Audacity, adding it to my video editing software, then exporting the final project.
In instances like these, or other instances where you’ll be further editing the file later, you never want to export audio in .MP3.
Why?
Because you may end up compressing the same audio multiple times, further degrading its quality for no benefit to the end listener.
Therefore, only export as .MP3 for the end product. Work in .WAV when possible up until the final export, and you will preserve more of the recording’s quality.
Exporting .MP3 Audio In Audacity – Advanced Settings

In this section, I will assume that you’re going to be exporting primarily dialogue content – podcast episodes, audiobooks, etc. This is because musicians should not be exporting their audio as .MP3 in the first place, as noted above.
You can see here under ‘format options’ that there are a large number of audio settings to choose from. Typically for web content, the exact settings I use are pictured here. Let’s look at each one of them in a bit more detail.
Bit Rate Mode: This determines how the MP3 file is created. Always keep in mind that there is a balance between file size and quality – as quality goes up, so does file size.
The ‘Constant’ setting keeps it at the same quality throughout the entire recording, regardless of what is going on, where settings like ‘Average’ or ‘Variable’ may make minor fluctuations dependent on what is going on in the audio.
For example, the variable setting may drastically lower quality in periods of silence, then use higher-than-average quality during dialogue.
I use ‘constant’ because it gives the most predictable file and I consistently know what to expect. It also has higher compatibility with old software. The downside is that it tends to lead to a larger file size than variable bit rate.
Quality: Again, as quality goes up, so does file size. 128 kbps is more than enough for dialogue, and even podcasts that use intro music or sound effects. You are unlikely to notice a difference in quality going higher. Many shows even use 96 kbps to further cut down on file size.
Channel Mode: Most podcasts and audio books aren’t recorded in stereo, so this doesn’t matter much. Choosing Joint Stereo will cut down on the file size a little bit.
Audio Metadata
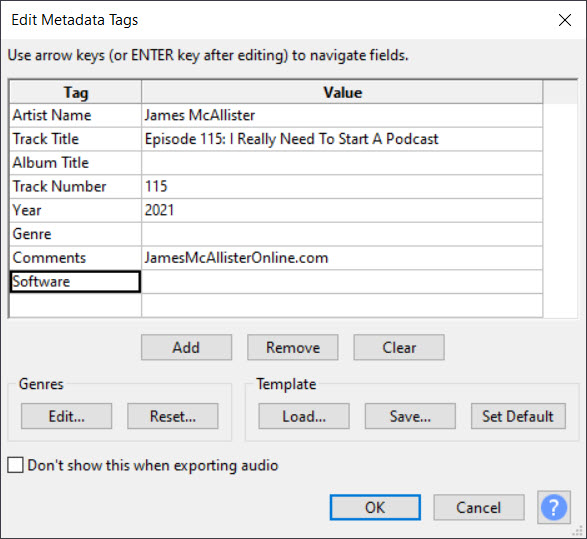
The final step to exporting audio in Audacity is to add metadata.
Note that this step is completely optional, and you can disable this box from appearing by clicking the ‘Don’t show this when exporting audio’ checkbox in the bottom-left corner.
Besides, even if you skip this step now, you can still add it all later.
Metadata is bundled to the file, and may appear alongside the file on people’s computers. You can see an example of this here:

I make most of my audio files available for download, so I like including this information so people can remember who I am, and where they got the audio file from.
It’s a small thing, but it helps.
To save time, you can even create templates in Audacity that will pre-fill all of the information for you!
Conclusion
Exporting audio in Audacity doesn’t take very long, and overall the process is very simple.
However, there are a few decisions you have to make in order to end up with the ideal file to distribute.
That being said, once you know what settings are right for you, it very quickly becomes second nature, and is something you’ll no longer think about.
I hope that you’ve found this article helpful. For more Audacity tutorials, click here.
To your success,
– James McAllister

Hey James you wrote such a quality post of information related to audio audacity. I am working on Spotify so, i understand the importance of audio audacity. Such a good piece of new information which will is really very helpfull young folks like me to manage their work in this technology era. I will share it with my friends.
Kristin_Wagoner(Quote)
Best of luck on your tracks Kristin!
James McAllister(Quote)