In a previous lesson, we looked at all of the various toolbars that Audacity has to offer.
Now, let’s go down and look at the tracks themselves – including all of the various settings, buttons, and sliders. By having an understanding on each one of these things does, it will make it easier to work with tracks in Audacity.
This article is particularly important if you plan on working with multiple tracks at once, such as when recording two-person podcast interviews, or multiple musical instruments.
Stereo Vs. Mono
Note that tracks can either be in mono (single channel) or stereo (dual channel.) Unless you’re recording with multiple microphones or you otherwise have some special reason to, you’ll usually be recording in mono.
If you import audio from elsewhere, it may import as stereo, on two identical audio tracks (as pictured below.) In this instance, the top is the left channel, and the bottom is the right channel.
This is fine, and won’t affect your audio in any way. However, if you want to convert this into a single mono track, you’ll learn how to later on in this tutorial.
A Quick Overview Of Audacity Tracks
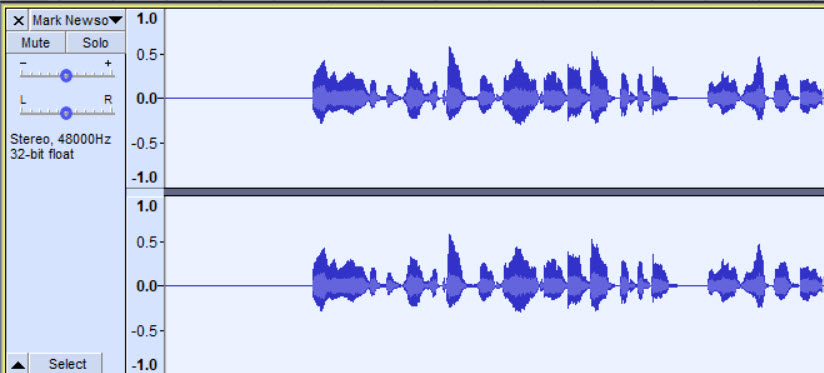
X: Closes the track. if you do this by accident, clicking ‘Undo’ will bring it back.
Track Name: Next to the X is the name of the track. This will default to the name of the audio file if you dragged one in, or just ‘Audio Track’ if you record within Audacity. We’ll go over how to change the track names in a moment.
Mute: Mutes the audio track. If you have multiple tracks within Audacity, it will still playback any tracks that aren’t muted. This is useful for example, if you’re recording a band and you only want to hear certain instruments.
Solo: This does the opposite of muting. If ‘solo’ is selected for a track, you will only be able to hear that track while playing back the recording. All of the others will be temporarily muted.
Gain Slider (- / +): This adjusts the gain for the track, making it louder or quieter. If using multiple tracks, this is useful to ensure that each track is at the proper audio levels and blend together nicely.
Panning Audio (L / R): This allows you to pan the audio to either the left or right channel. For example, if it were all the way to the left, the audio for that track would only come out the left speaker.
Stereo / Mono: This indicated whether the track is in stereo or mono.
Sample Rate: In this example, the sample rate is 48000hz, or 48 kHz. If you’re recording for film, 48 kHz is standard. For podcasts and most other audio, 44.1 kHz is standard. Unless you have a reason to change this, don’t. Also, it is best to keep each audio track the same sample rate. You can see the ‘project sample rate at the bottom of your screen.

Bit Depth: In this example, the bit depth is 32-bit float. Audacity also supports 16-bit PCM and 24-bit PCM. Unless you are working with ancient hardware or you have some other special reason to, 32-bit float will always be the best choice.
Scrolling all the way down to the bottom, let’s look at those two other buttons.
Collapse Arrow: See the little arrow pointing up? This collapses the audio track, without closing it. This is useful if you are working with a lot of tracks that are cluttering up your screen. Collapsing lets you get these out of the way so you can focus on the more important tracks. To uncollapse it, simply hit the arrow again.
Select: This selects the entire audio track. Note that clicking anywhere in the empty space will also do the same thing. You can tell which audio track is selected or armed for recording, because it will have a yellow box around it. Holding the CTRL key while clicking on a track will allow you to select multiple tracks at once, although the yellow box may only appear around the most recent track you’ve clicked.
Audacity Track Options
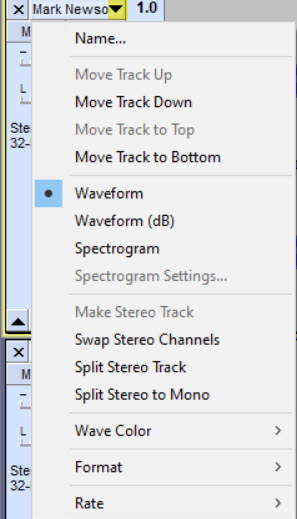
Let’s now dive into some of the additional track options. To access this menu, click the arrow next to the track name, which I have highlighted in yellow above. Note that if any of these options are greyed out, they may not be applicable to the track you’re working with. Alternatively, you may need to make sure that the track has been stopped with the stop button (not merely paused) before these options become available to you.
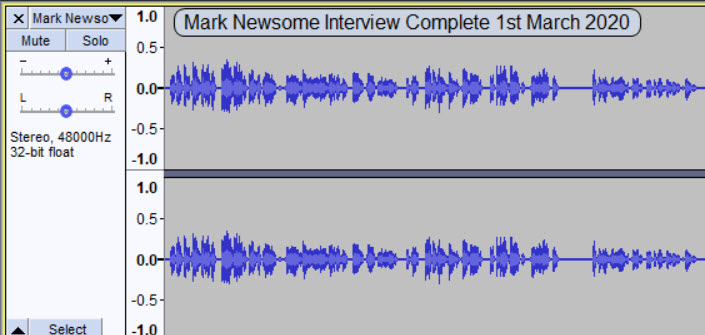
Name: Allows you to rename the track. Note that this may get cut off if the track name is long. If you’d like, you can cause the track name to appear over the track itself by going to Edit –> Preferences –> Tracks and checking the box that says “Show audio track as overlay.” This will then overlay it over the track like this:
Move Track Up / Down: If you have multiple tracks, this will change the order. In the above example, the ‘Move Track Up’ button is greyed out, because the track is already on top. If it were on the bottom, the ‘Move Track Down’ button would be greyed out instead.
Move Track To Bottom: Moves this track all the way down to the bottom, beneath all other tracks.
Waveform: The next four settings – Waveform, Waveform (dB), Spectogram and Spectrogram Settings all are related to how the audio is displayed on the timeline. By default, Audacity shows ‘Waveform’. This displays the audio waves on the timeline that you see above.
Waveform (dB): This also displays waveforms, but they’re measured in decibels.
Spectrogram:
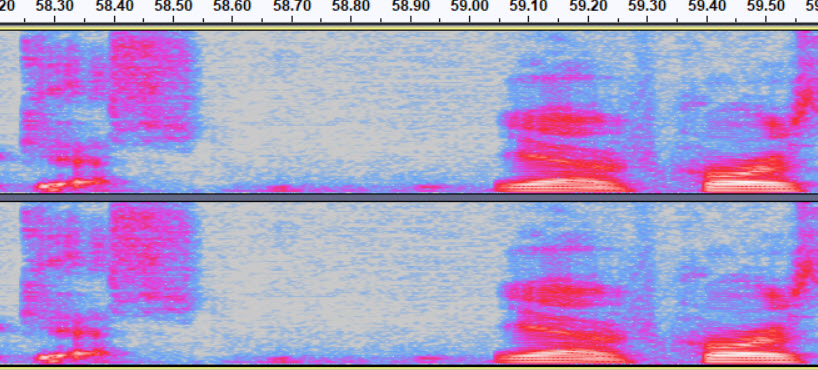
The spectrogram is an alternate way to look at the audio. Not only does it demonstrate timing and amplitude (how loud or soft the sound is), it also can demonstrate frequencies.
It is most useful in identifying problem areas – for example, electrical interference or noise. It can also easily visualize things like mouth clicks or the sound of saliva moving in your mouth.
For a relatively simple example, you can see the space there without much color – but still blue dots scattered throughout. That actually sounds quite silent when played back on my headphones, at a normal audio level. However, the spectrogram shows that there is still a lot of audio there!
We’ll learn more about the spectrogram in a future lesson.
Spectrogram Settings: Allows you to edit settings pertaining to the spectrogram, such as the frequency range that it covers.
Make Stereo Track: If you’re working with a mono track, this will convert it into two equal stereo channels.
Swap Stereo Channels: This will flip the left and right channels. The audio that was previously coming out of the left channel will now come out the right, and vice-versa.
Split Stereo Track: If your track is in stereo, this will split it into two separate mono tracks that you can edit separately. By default, the first one will be panned all the way to the left, and the second one will be panned all the way to the right. However, these tracks are now separate, and you can edit them however you please.
Split Track To Mono: Splits the stereo track into two separate mono tracks, panned center.
Format: Allows you to change the bit depth. I recommend keeping this on 32-bit float.
Rate: Allows you to change the sample rate. 48000 hz is common for video work, and 44100 hz is standard for everything else, unless you have a specific reason to use something different.
Conclusion
You now know a little bit more about tracks in Audacity, and what each of the settings mean.
While most of these won’t be used that frequently for podcasters or content creators, I hope that you’ll have an easier time editing audio in Audacity.
Of course, if you have any questions, please feel free to leave a comment below and let me know. Be sure to check out my other Audacity tutorials as well for more tips and tricks.
To your success,
– James McAllister
