Once you’ve got Audacity up and running – you’ve either imported audio or successfully recorded some, you may find yourself asking – what now?
Audacity can appear a bit confusing, with a large number of different buttons, menu and icons that don’t have obvious uses. Fortunately, they are all pretty easy to pick up with practice.
In this article, I aim to break down and explain all of these, so you can get a better idea on how to navigate Audacity and explore all of the tools available to you.
Audio Controls (AKA the ‘Transport Toolbar’)

First up, we have the basic audio controls. From left to right, they are the following:
Pause: Pauses the audio wherever it’s at on the timeline.
Play: Resumes playing the audio, from wherever the vertical cursor marker is positioned. You can move this around by clicking the grey bar above the timeline, where the seconds are located.
Stop: Stops playing the audio, and moves the vertical marker to the beginning. This is different than the pause button, which will keep the marker wherever you stopped.
Skip To Beginning: Moves the cursor to the beginning of the project.
Skip To End: Moves the cursor to the end of the project. This is useful if you want to continue recording where you left off.
Record: Records new audio, with whatever microphone you have selected.
Tools Toolbar
Next up, we have the tools toolbar. Let’s first look at the top row, from left to right.
Selection Tool: This tool allows you to quickly highlight audio, by clicking and dragging on the audio timeline.
Envelope: This one can seem a little confusing. Essentially, it allows you to gain better control of the dynamics of the audio, as it progresses. For example, you can use it to select a point where you’d like the audio levels to start changing. Add a second point, and change the dynamics to be either louder or software. Between the first and second points, the audio will start fading softer if the second point has softer dynamics, or the audio will start increasing in volume if the 2nd point is louder. You can see a picture of this here.
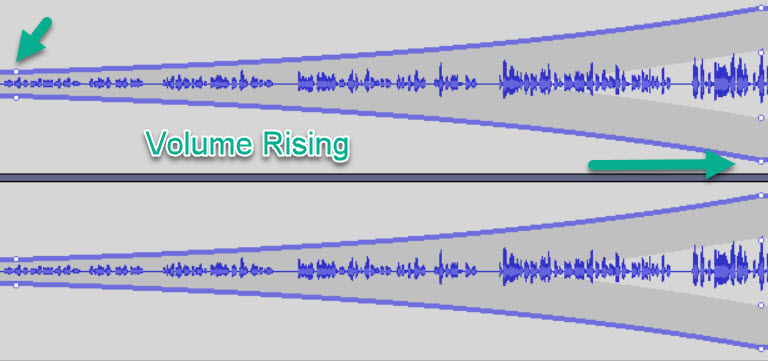
The envelope tool is most useful when you need to fade tracks in and out. For example, you may want to fade out podcast intro music while bringing in the main dialogue recording.
Draw Tool: The draw tool allows you to redraw very specific areas of the audio. This is different to the envelope tool, as you can get much more refined with it. It is commonly used to remove mouth clicks and pops. It can also repair sections of the audio where your mouth temporarily moved away from the microphone, you spoke too loudly, etc. Think of it as a refined dynamics editor.
Let’s now look at the bottom row, again, going from left to right.
Zoom Tool: This allows you to zoom in and out on the project timeline. With the tool selected, you can zoom in by clicking the left mouse button, and zoom out by clicking the right mouse button.
Zooming is something you’ll be doing a lot while editing with Audacity, so it helps to memorize the shortcuts. The shortcut for zooming in is Ctrl+1, and the shortcut for zooming out is Ctrl+3, and this will work even if the zoom tool is not selected. If you work with Audacity a lot, I recommend purchasing a mouse like the Logitech G600, which has programmable keys on the side that you can map to any shortcut you wish. It’s easier to just press a button on the side of your mouse with your thumb, then to remember all of the various shortcuts.
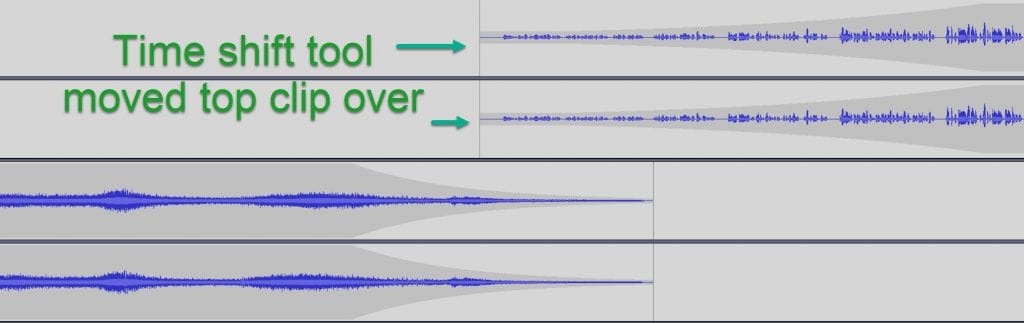
Time Shift Tool: This tool allows you to move clips around, so they start and end at different times. This is most useful in multitrack editing – for example, so two clips do not overlap each other. You can see an example of this below – notice how in the top track, there is empty space on the left-hand side. This was created using the time shift tool.
Multi-Tool: If switching between each tool is frustrating to you, the multi-tool can help. The multi-tool makes all tools accessible depending on where you click on the timeline, and any modifying keys you hold down (for example, holding Ctrl while using the multi-tool allows you to zoom in and out with your mouse wheel.)
Audacity Meter Toolbar
![]()
Both of these are quite simple. While recording audio, the bar on the left side will fill up, indicating how loud your audio levels are. If you click it to start monitoring, you will hear your audio played back to you in real-time while you record. This is useful to hear everything that’s coming through your microphone’s signal.
Typically, you’ll want your average speaking volume to go no louder than -12db. This is because you need room to work with in case you accidentally speak louder. If your audio reaches 0db, it will clip and distort, which unfortunately isn’t something you can fix.
On the right side, you’ll see the meter for the output – the sound played back to you while listening to it.
Audacity Mixer Toolbar
![]()
This is another one that’s pretty simple.
On the left-hand side, you have the recording volume. Move this up, and your audio will record louder into Audacity. Move it down, and the recorded audio will be quieter.
On the right-hand side, you have the playback volume. This will affect how loudly the audio will play back to you while working with it in Audacity. Note that this doesn’t change the actual audio levels themselves when you go to export it or share it with others. Therefore, I recommend keeping this one all the way up so you can accurately hear how it will sound when it’s exported.
Audacity Edit Toolbar
![]()
Let’s look at each of these icons, again from left to right.
Cut, Copy, And Paste: You’ve likely heard and used these before in other applications. These allow you to highlight audio and paste them in different sections. Note the difference between cut (1st icon) and copy (the 2nd icon.) If you copy an audio and paste it somewhere else, it will leave the original clip in place – only making a second copy wherever you pasted. If you cut the audio and then paste it somewhere else, it will remove it from the original place, and paste it in the new one.
Trim Audio Outside Selection: If you highlight some audio on a track and then press this button, everything except what you have selected will be removed.
Silence Audio Selection: This will take whatever area is highlighted, and completely silence all audio that is there. This is useful if there is a lot of noise in between your speech for example, and you don’t want people to hear it. Note that this tool replaces the audio with complete silence, rather than deleting the selection. This means that no changes will be made to the timing (it won’t cut the clip at all.)
Undo (arrow pointing left) and Redo (arrow pointing right): These are also commonly found on many programs. They will undo or redo the last changes that you made. They’re useful if you mess something up and need to fix it.
Zoom In / Out: This accomplishes the same thing as the zoom tool. It will increase or decrease the amount of audio displayed at once, making it easier to edit or jump around.
Fit Selection To Width: Highlight a section of audio, then click this button. Audacity will zoom in so the selection covers the entire width of the timeline, allowing you to zoom in on specific sections of audio.
Fit Project To Width: This will zoom out until the entire project fits on the timeline, giving you a full overview of the entire project.
Zoom Toggle: The zoom toggle will toggle between two defined zoom levels. You can adjust which two levels this will toggle between by going to File -> Preferences -> Tracks.
Audacity Play-At-Speed Toolbar
![]()
This toolbar has one simple job – adjust the rate in which audio plays back while listening to it within Audacity.
This is useful while editing to speed up your workflow. Simply increase the speed, and it will play back to you more quickly. This allows you to quickly find problem areas (for example, places where you stumbled and need to trim) and remove them.
If you double click on it, you can manually type in what you want the playback speed to be. This is useful if you accidentally adjust it and you can’t get it back to normal playback speed (1.0).
Audacity Device Toolbar
![]()
The sole purpose of this toolbar is to handle the input and output of your audio.
Long story short, here is where you choose which microphone you’ll use for recording, and which device you’ll use for playback (such as your speakers.)
Note that if your microphone does not show up here, you’ll want to make sure it is enabled in your sound settings. For more information, see this article for setting up USB microphones, or see this article for setting up Audacity with audio interfaces.
There is one setting we’ll want to pay further attention to, the one all the way on the left.
If you’re on Mac or Linux, you will only have one option here. If you’re on Windows, you’ll have 3 – MME, Windows DirectSound, and Windows WASAPI.
In order from newest to oldest, it goes Windows WASAPI, Windows DirectSound, and MME. This is generally the order of preference you’ll want to use.
However, some WASAPI and DirectSound can have compatibility issues with some devices. Therefore, if you hear any weird audio errors while recording or playing back audio, switch to MME.
The one downside to MME is that there can be a tad bit more latency. However, this isn’t much of an issue on modern computers.
Audacity Selection Toolbar

Finally, all the way at the bottom, we have the Audacity Selection Toolbar. From left-to-right, here are all the different sections:
Project Rate (Hz): This is the sample rate of the project. For video, 48000 Hz is common. For other non-film work, 44100 Hz is standard. I recommend these unless you have a specific reason to use something else.
If you have imported audio that uses a different sample rate (for example, audio that was recorded somewhere else) you may wish to change the project sample rate to match it. All new tracks created within Audacity will use the project sample rate by default.
Snap-To: Snap-to is based off of the measurement you’re using for the ‘Audio Position’. For example, if you have the audio position set to ‘seconds’, then enabling Snap-To will always snap to the nearest second when selecting audio. This is useful if you need to highlight exactly 5 seconds, for example.
Audio Position: This shows you exactly where the play-head is, if playing back, it will show the exact part in the timeline that is currently playing. The arrow next to it can be clicked to change it to different units of measurement.
Start and End of Selection: If you have audio selected, this will show both the exact beginning and the exact end. Like the audio position, the units can be changed by clicking the arrows.
Center frequency and Width: This can be toggled to show the low and high frequencies as well by clicking the drop-down. This is only useful when using the spectral editor.
Moving Toolbars Around + Resizing Audacity Toolbars
Audacity’s interface isn’t static – it can be customized to your liking.
Notice the little box with horizontal lines on the left-hand side of each toolbar? Grab onto this, and you can move the toolbars around to your liking.
Likewise, you can adjust the size of each toolbar by hovering your mouse over the right edge of the toolbar, and dragging. Your mouse cursor will turn into a picture of two horizontal arrows, indicating that it’s ready to be resized.
Within my Audacity tutorials, I keep things where they are by default in order to make it easier to follow along. However, you can (and should) adjust it to your liking.
Additional Toolbars
This concludes all of the main toolbars that you’ll find when opening up Audacity for the first time.
However, there are two more (lesser-known) toolbars that you can enable within settings – the Scrub Toolbar, and the Spectral Selection Toolbar.
You can access these by going to View –> Toolbars, and checking the two that are unchecked.
Likewise, if you wish to hide any of the toolbars within Audacity, you can do so by following these same steps, but unchecking the toolbars that are checked.
Conclusion
I hope you’ve found this overview of the various Audacity editing tools helpful.
Each have their own special use case, and a familiar understanding of all of them will help you edit quicker and more productively.
Be sure to check out our other Audacity lessons to learn other useful Audacity tips and tricks, as well as explore other areas of the Audacity user interface!
To your success,
– James McAllister
