You should never simply plug in your microphone, and immediately start recording. This is an easy way to end up with a ruined audio file, that only a few seconds of preparation would have prevented.
It’s crucial that we address some things that you should do before you start recording your audio into Audacity. These are very important to do, because there are certain things you want to make sure you get right before you actually sit down to start recording.
They only take a few moments, but they can literally prevent your entire recording from getting ruined. I can’t tell you how frustrating it is to spend time recording something, only to realize that something wrong happened and the recording is unsaveable. It happens to beginners all the time and it sure is disheartening.
I’ve even heard stories of podcasts hosts having to throw away entire interviews with important guests due to poor recordings. Scary stuff!
Anyway, these prerecording checks aren’t challenging. Quite simply, all you need to do is take a quick practice recording, and playing it back, or doing something called monitoring, which allows you to listen back to the audio signal in real-time. If you’re going to be using real-time monitoring, you’ll want to do it with headphones, so the sound coming from the speaker doesn’t feed straight back into your microphone.
How To Monitor Audio In Audacity

If you want to monitor, you can simply go up to this section up here, and click where it says ‘Click To Start Monitoring’. You’ll see when you turn it on that you should start seeing the bar fill in as you talk into your microphone.
Example Of Poor Recordings – Clipped Audio
For the sake of this tutorial I will record a quick passage and play it back. I’m going to record this poorly, so it may sound pretty bad. But that’s the point.
Let’s take a listen. Note that this may be quite loud, so headphone users should watch out.
Wow! As you can hear, that sounds terrible. Why is that?
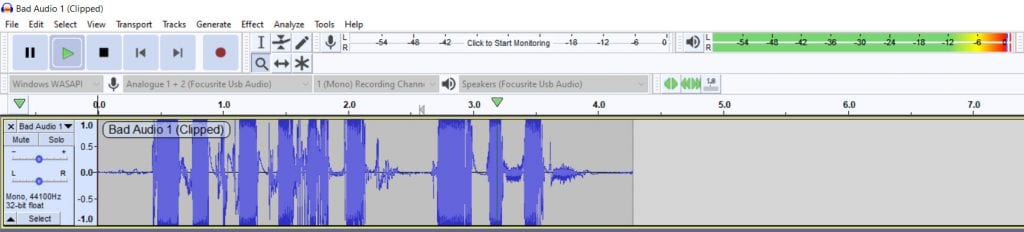
The first reason is because the audio was recorded too loudly. If you look up at the meter here, you can see it is going completely full, up to the ‘0’. Well, when the audio hits signal, it does something called clipping. When this happens, the top of the waveform is literally cut off, which leads to this strange, distorted sound. You can actually see this if you look at the wave – this is why it looks completely flat at the top. It is consistently being clipped.
If you’re a musician or you’ve ever played electric guitar with distortion, it’s kinda like this effect done on purpose. For the sake of dialog though, it’s something you probably never want, and if you happen to clip your audio while you’re recording there’s a chance that it will pretty much be unsaveable.
How To Turn The Recording Volume Down In Audacity
So, how do we turn the volume down? Well, if you’re recording into an audio interface, you should have a gain knob that you can physically turn. Some other microphones may have volume sliders or volume knobs on them already.
![]()
If there isn’t anything like that on your microphone, you can go up to this ‘Recording Volume’ slider up near the top of your screen, and move that down. Although it’s best to adjust this on your microphone or audio interface first when possible.
Proper Microphone Positioning
Finally, you may talk more quietly or move the microphone farther away from your mouth. Proper microphone positioning takes trial and error, and will be different for each microphone.
This is important anyway though, and here’s why.
If the microphone is too far away and sound starts falling off, you’ll have to amplify the sound source in Audacity or through your interface. This also leads to the background noise being amplified, which is usually something you don’t want.
If it’s too close, you may experience something called the proximity effect, which boosts the lower frequencies of your voice causing it to sound muddy. People may also hear mouth clicking, or saliva moving around in your mouth, which is also unpleasant. There is software (such as iZotope RX8) that can remove these mouth clicks, but it costs money and is an extra step you have to take. Listen back through your recording and see how it sounds – overall, your own ear will always be the best judge.
What Audio Levels Should You Record To?
So, what audio levels should you be recording to? Ideally, they should be hovering in around -12. You don’t want to record all the way to 0, because naturally you’ll speak louder at some points and this will cause the audio to clip. The start of sentences for example we tend to annunciate with more force behind them. Recording to around -12 gives enough room to account for this.
Again, if you record too quietly, you’ll have to amplify it after you’re done recording, which will also amplify all the background noise the same amount.
Avoiding Plosives In Audacity
So far we’ve talked about volume, mouth clicks, and a little about microphone positioning. Next let’s talk about something called plosives.
Plosives are bursts of air that most commonly appear when making ‘p’ or ‘b’ sounds. Now that I’ve turned my audio levels down, let me demonstrate.
As you can hopefully hear, these plosives are unpleasant and while they won’t ruin recordings, they aren’t pleasant to listen to.
There are two ways you can fix this.
The first is to purchase what’s known as a pop filter or windscreen. These will usually fit over or go in front of your microphone, and most do a good job at eliminating plosives. These are usually only a few dollars and some microphones come with them already. Note that these do change the tone of your recording ever so slightly, but for most people the tradeoff is worth it.
The second is to experiment with positioning your microphone, particularly so it’s not pointed directly at your mouth. This is one reason that you sometimes see people holding microphones below or to the side of their mouth. As an added benefit, this also cuts down on breath noise.
With all that out of the way, I really must make a case for monitoring your audio as you record. You’ll want to buy a pair of decent closed-back headphones for this, this way you’re only hearing what’s coming through your microphone and not anything else in the room around you. I personally use the Sennheiser HD 280 headphones, they run for about 100 bucks and are used in a bunch of recording studios around the world. I’ll put a link for those in the description. Still, any headphones you have will help.
