If you’re going to be recording directly into Audacity, you’re going to want to make sure that you’re using some sort of external microphone, rather than the microphone that’s built-in to your laptop. In this article, let’s quickly look over how you can set up your microphone with Audacity, on a Windows operating system.
Recording With A USB Microphone
Built-in microphones are designed to be barebones, they’re incredibly cheap and even a very inexpensive USB microphone will be substantially better than what’s built-in. People can immediately tell the difference, and all-in-all it just sounds so much more professional.
Fortunately, changing the settings in Audacity to use your USB microphone are quite easy, and it only takes a few seconds.
Step One: Plug In Your Microphone, And Wait For Drivers To Download
First things first, if you’ve just got this microphone or you haven’t used it before, there’s a quick step you’ll need to take first. Once you plug it in, Windows should start downloading the drivers, and you shouldn’t have to do anything else in that regard.
What you will need to do is enable the microphone in your computer’s settings. This may happen automatically, but in case it’s not, let me quickly show you how this can be done.
Step Two: Open The Control Panel, And Navigate To Sound Settings
To access your computer’s sound settings, do the following:
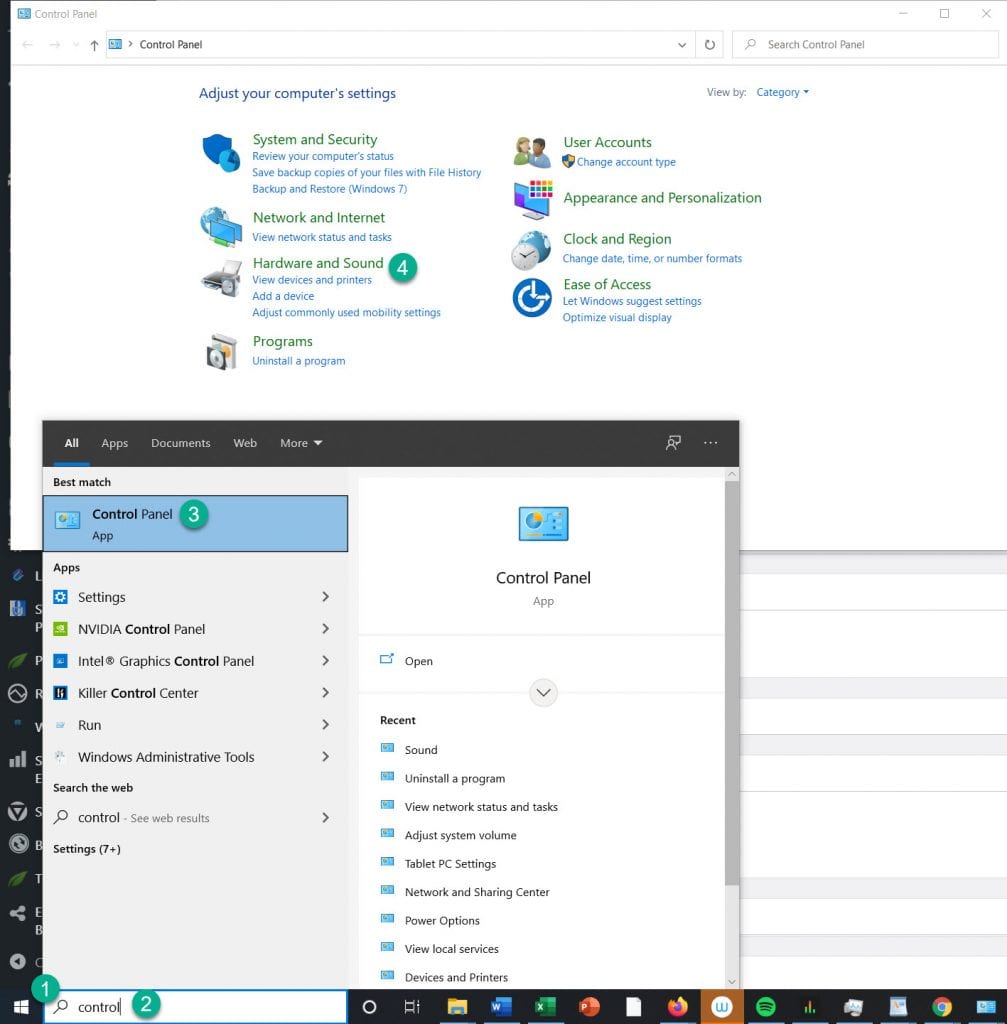
1. Click the start icon.
2. Type ‘Control Panel’ into the search bar.
3. Click On Control Panel
4. Click ‘Hardware And Sound’
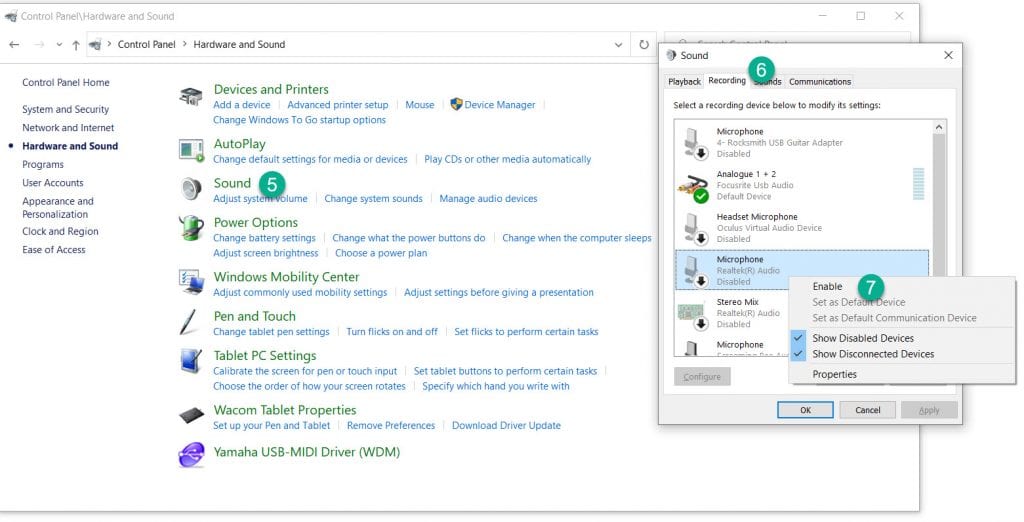
5. Click on ‘Sound’
6. In the new box that pops up, click on the tab that says ‘Recording’
7. Right-click on your microphone, and then click ‘Enable’.
Step Three: Selecting Your Microphone In Audacity
Now that we’ve got that all done and out of the way, your microphone will actually show up as an option we can work with once we open up Audacity. Let’s go ahead and do that now.
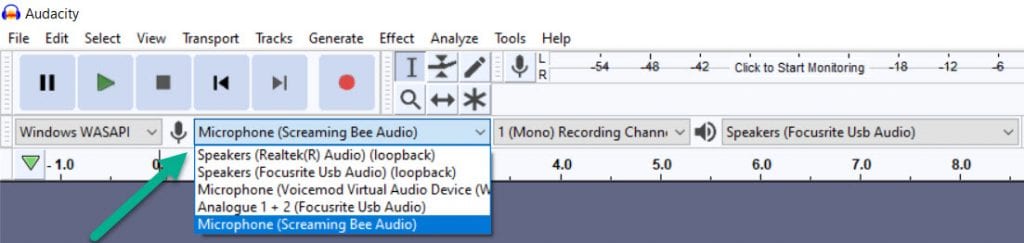
Once Audacity opens, we can go to this area here where we select microphones, open that up, and we should see our microphone listed. We can now switch to it, and start recording.
If you aren’t sure whether or not it’s actually using the correct microphone you can always tap gently on the microphone a few times and see if it registers the taps.
Recording With An Audio Interface
If you’re using an XLR microphone with an audio interface, the steps are nearly identical – you may still need to enable the microphone in settings, and it will still appear in the same spot within Audacity.
You can actually see this above – I am using a Focusrite Scarlett interface, and you can see it listed in my list of microphones. For this audio interface, it is listed as “Analogue 1 + 2 (Focusrite USB Audio).”
Note that unlike USB microphones where the drivers are usually detected and downloaded automatically, most audio interfaces at least on Windows will require you to go and download drivers before you’ll be able to work with them. You should be able to find these on the manufacturer’s website, or simply Google the name of your audio interface plus ‘drivers’ and the proper page should come up. Some audio interfaces also come with a CD, but that’s becoming increasingly rare as many laptops no longer even have CD trays.
(Wow, it actually makes me feel pretty old to realize that!)
If you’ve used your audio interface with other DAWs in the past, chances are you already have the drivers working correctly.
When you go to enable your audio interface in the Windows control panel, you may as well make it your default recording device if you haven’t already.
This isn’t a requirement and Audacity will still work fine even if it’s not your default device, but most people using an audio interface permanently with their computer will usually want all the audio processing going through it. This includes both recording and playback, if you have external studio monitors attached to the interface.
MME vs Windows DirectSound vs Windows WASAPI
Now one more thing before we move on. You can see just next to the microphone we have this other box right here, containing three settings – MME, Windows DirectSound, and Windows WASAPI, which stands for Windows Audio Session API. All of these are only available on Windows, if you’re on Mac or Linux you’ll likely only have one option.
Long story short, MME has the largest compatibility between different devices. Windows DirectSound is a bit newer and may have lower latency, essentially meaning the time it takes for audio to actually process once you speak, is quicker.
However there may be a higher chance of issues. WASAPI is even newer, but still, may have compatibility issues. Try each one of these out, starting with Windows WASAPI first and if there are any issues, you can always switch just by clicking on it and selecting a different option.
Conclusion
So that’s all there is to it. If your audio ever sounds off, check to make sure the correct microphone is selected and you should be good to go. And if you want to see some of my recommended USB microphones or microphone accessories to make recording easier, be sure to check the description as I’ll put some of my favorites there.
