The iPhone has a lot of fantastic image editing tools built into it, and even more are available through apps.
One common edit people like to make to their photos is inverting the colors – this can be a lot of fun, and yield some surprising results!
But how do you actually invert colors on iPhone photos, and what is the best way to do it? How do you make a photo negative on iPhone?
In this article, we’ll cover several different methods you can use, so you can try out whichever one is most appealing to you.
1. Upload Your Photo To A Website Like PineTools
The quickest and easiest method to upload your photo to a website like PineTools, which can be accessed by clicking here.
PineTools has a large number of photo editing capabilities built directly into their website, including a tool that can invert the colors of your picture with just the click of a button.
This solution works best if you only need to edit a small number of photos. Because you have to upload them one at a time, it makes it quite slow if you have lots of photos that you need to invert.
However, it doesn’t require you to download any third-party apps, and you will still retain a copy of your original photo.
Therefore, we consider this to be the ideal solution if you only have one photo you want to invert, and you don’t need the advanced photo editing capabilities that some third-party apps have.
2. Invert Your Entire iPhone
Did you know that it’s possible to invert the colors of your entire iPhone, within every app on your phone?
This is normally a setting to help with people that have vision problems. However, it can be enabled by anyone in just a few steps, and is quick to turn on or off.
This means you can browse through your entire gallery to see your photos as inverted, without having to really take any extra steps.
To turn on inverted colors with your iPhone, follow these steps:
- Open the Settings app.
- Tap on ‘Accessibility.’
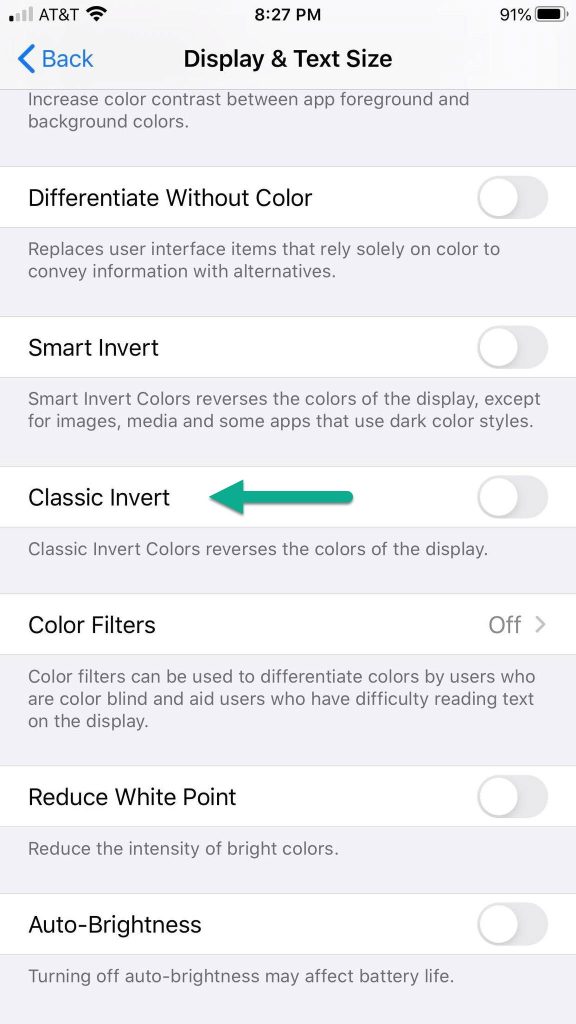
- Tap on ‘Display & Text Size’
- Turn the toggle for ‘Classic Invert’ to on.
Your phone will immediately invert all colors on everything, including the UI. You can now go back to your Photos app and browse through your gallery to your heart’s content!
Note that you will want to turn on ‘Classic Invert’, not ‘Smart Invert.’ Smart Invert will invert and reverse the colors, but it will specifically avoid inverting photos, videos and other media. Therefore, it is useless for us in this case!
Once you are done viewing your inverted photos, return to the Display & Text Size settings to turn Classic Invert back off.
3. Use A Third-Party App
Finally, the last thing you should consider is using a third-party app to invert your photos.
This is the ideal solution if you have a lot of photos that you want to invert, and you want to keep the inverted photo permanently on your phone. This will be necessary if you want to upload the inverted photo to a third-party platform, like Instagram, Snapchat or TikTok.
Anyhow, there are a number of free / cheap apps on the App Store that can be used to invert photos. Some examples include:
- Adobe Lightroom
- Photoshop Express
- Negative Photo
Out of these three, the one we recommend the most is Adobe Lightroom. It has the fastest workflow while also having an extremely large number of photo editing capabilities – you could even make only specific parts of the photo inverted if you want to!
If you take the time to learn Adobe Lightroom – even simply through their mobile app, you will be able to make edits to photos you never thought possible. And with thousands of presets and filters available online for free, it really is one of the must-have apps for people that love iPhone photography.
Anyhow, to invert a photo using Adobe Lightroom, follow these steps:
- Open Lightroom and import your photo.
- Go over to the Light Section, then the Curve section.
- In the tone curve section, drag the bottom-left handle to the top left, and the top-right handle to the bottom right.
- Tap the ‘Share’ button in the top-right corner, then select ‘Export to Camera Roll’.
This will save the inverted photo in your Photos app, giving you both the original and the newly inverted picture in your gallery.
Is There A Way To Invert Photos Without An App Or Tool?
Unfortunately, there doesn’t seem to be a way to invert photos directly from the iPhone’s photos app.
Although the Photos app allows you to make many adjustments to the color (such as changing the brightness, contrast, hue and saturation of the colors), there doesn’t seem to be way to invert it directly.
We tried this on both an iPhone 13, and an iPhone XR running the latest version of iOS.
We hope that Apple continues to expand upon the native photo editing capabilities later on. However, there are still plenty of other apps that offer far more powerful photo editing capabilties, including the ability to invert the colors of your iPhone gallery pictures.
Conclusion
Thankfully, there are several things you can do to invert your phone’s photos.
However, the exact method you’ll want to use will depend on your specific needs. While inverting your entire iPhone will allow you to view lots of inverted photos quickly, uploading to a website like PineTools may be the quickest solution for a single photo.
I hope that you’ve found this article helpful. If you have any other questions about iPhones, please ask them using the comment form below.
Wishing you the best,
– James McAllister
