Are you trying to upload a new profile picture to Instagram, but it keeps appearing blurry when you go to view it?
Although this is frustrating, it’s a surprisingly common problem. Thankfully, that means that we know a lot about how to fix it.
In this article, I’ll be sharing several different tips to help you make your profile picture appear sharper, and far higher quality – that way, it will look wonderful once uploaded to your profile.
Let’s get to it!
Why Is My Profile Picture Blurry On Instagram?
Before we cover how to improve the quality of your profile picture, we must first understand why new profile pictures can appear blurry in the first place.
Really, it comes down to a few factors.
One of the most prominent ones is resizing. Regardless of the size of the actual photo, Instagram will resize it down to just 320 x 320 pixels. Then, on your page, it will only display at a mere 110 x 110 pixels.
This is extremely small, and can cause unexpected results if shrinking it down from such a large size – especially if your photos aren’t currently a perfect square, which I’ll talk more about later.
The second major issue is compression.
Instagram compresses all photos over 1 megabyte, in order to save space and help files load faster for other users. While they attempt to maintain as much quality as possible, this doesn’t always work perfectly.
Finally, it’s also possible that Instagram is experiencing some sort of software glitch / bug during photo uploading or processing, which can result in a blurry photo.
Thankfully, the tips below will address all of these!
How To Fix Blurry Profile Pictures On Instagram
Because there are a number of reasons why your profile picture may be blurry, there isn’t always a ‘one-size-fits-all’ solution to the problem.
Therefore, I recommend trying out several of these fixes together. Many of them will help improve the quality of your photos anyway, so you’ll only end up with a better photo as you try more of them out!
1. Compress The Photo Yourself
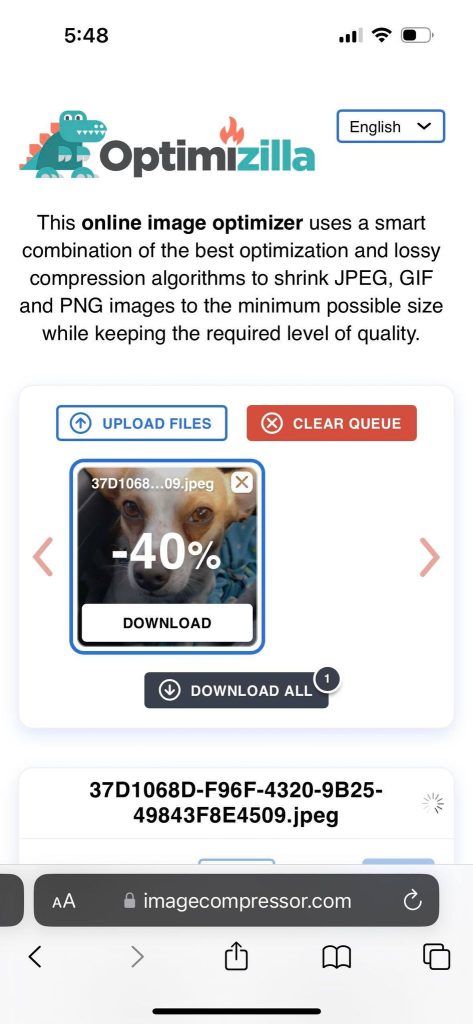
The first thing that you may consider is compressing the photo yourself.
If you can get the photo size small enough, you can bypass Instagram’s compression, as it won’t be necessary for them to compress it any further. This means that there is no opportunity for them to mess things up.
Thankfully, there are plenty of free image compressors online, such as ImageCompressor.com.
All you need to do is upload your photo there, and their software will compress it for you. Then, you can redownload it back onto your device.
When you go to change your Instagram profile photo, upload the new compressed version, rather than the original.
Note that different image compression tools will have different settings for you to play around with, which may yield higher or lower quality results. Therefore, it may be worth experimenting around with several if you’ve got the time!
2. Make Sure You Use The Right Aspect Ratio – And Pre-Crop If Necessary

Problems can occur when you upload photos that are either too wide, or too tall.
The ratio between the width and height of your photo is known as the aspect ratio, and undesirable results can occur if the difference is quite large!
This is because Instagram uses a 1:1 aspect ratio, meaning that they will crop the photo down to be the exact same height and width – a perfect square. This will then be cropped further, in order to fit inside the circle.
If you were to try and fit a wide photo into a square aspect ratio, it would be so scrunched up that it would be hard to see anything at all – making it appear quite blurry!
While Instagram allows you to crop while uploading, it can also be a good idea to do this beforehand, in your phone’s built-in photo editor.
This will allow you to select the perfect part of the photo, and prevent extreme cropping after it’s been uploaded. Of course, you should make sure that the main person or object in your profile picture is perfectly center, to avoid it being cut off!
Alternatively, if taking a new photo just for Instagram, you should see if your camera app has the option to take photos in a ‘square’ format. iPhone for example has this built-in as one of the primary options.
3. Enable HD Uploading Within Instagram’s Settings
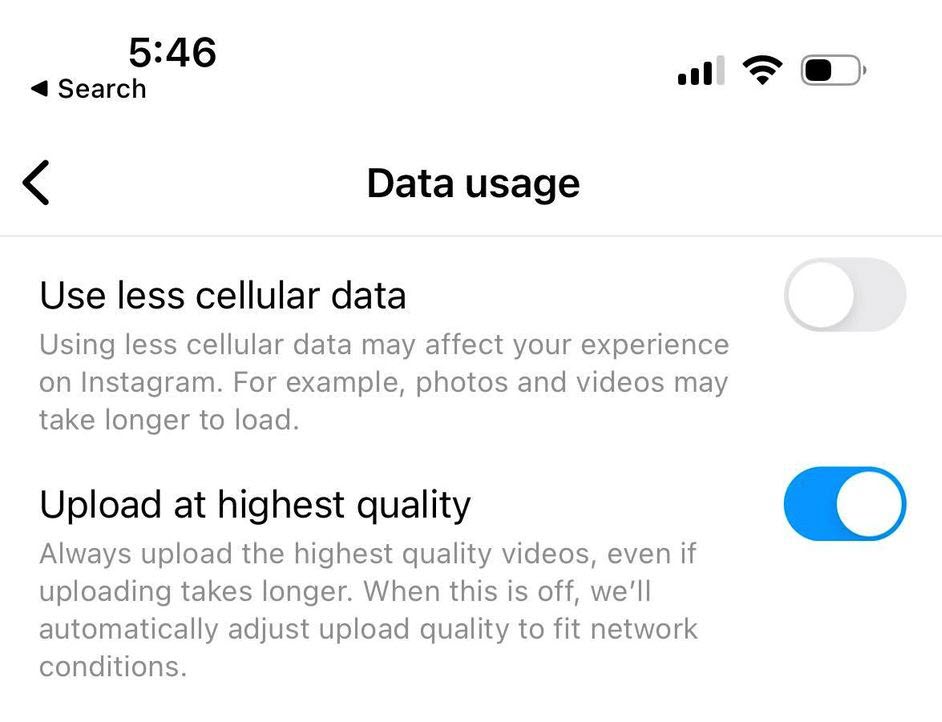
Next, you’ll want to make sure that you have the HD uploading setting turned on, which allows you to upload files in a higher resolution.
This can be enabled in Instagram’s settings, and only takes a few moments to check.
To enable HD uploading on Instagram, follow these steps:
- Tap on your profile photo to reach your Instagram profile.
- In the top-right corner, tap on the icon with three horizontal lines.
- Tap on ‘Settings.’
- Tap on ‘Account.’
- Tap on ‘Data Usage.’
- Make sure that ‘Upload at highest quality’ is toggled on.
While this primarily applies to videos, it’s still a good idea to make sure that it’s turned on regardless.
4. Consider Taking Your Profile Picture With Instagram’s Built-In Camera
If you’re taking a new photo and not uploading one from your phone’s camera roll, you may consider taking it with the built-in camera inside of the Instagram app.
Although you may lose out on some editing features, Instagram’s camera and photo system is already well-integrated. It’s possible that if the blurry photos are due to a bug or software glitch, that taking the photo inside of Instagram directly will fix it.
Instagram does still have a lot of editing tools and filters built into it, so it may not be a bad option.
Just something to consider!
5. When Taking The Photo, Ensure The Subject Is In Focus
This one makes a dramatic difference, and is unfortunately one you’ll need to get right when taking the photo.
If you upload a blurry photo to Instagram, it’s still going to be blurry once it’s on there.
So, you’ll need to make sure that the subject you’re trying to capture for the photo is actually in focus when the photo is being taken. Typically, this means that they’ll be center in the image, with the camera pointing right at them.
The reason I point this out is because I mentioned cropping earlier.
On wide photos, you’ll likely need to crop them down. It’s quite likely that only a portion of the photo is actually in focus. So, if you crop outside of that area, the picture can still appear quite blurry.
Therefore, it’s best to use photos where you’re the primary focus of the photo, rather than trying to crop yourself out from a group picture, for example.
6. Sharpen The Picture Before Uploading

Finally, one last thing that you could try is sharpening the image before uploading.
Sharpening a photo enhances the edges of a subject, making it appear to be less blurry, especially on smaller screens.
Thankfully, your phone likely already has a feature like this built-in!
All you’ve got to do is edit the photo, and increase the ‘sharpness.’ If you’re using an Android phone that doesn’t have any sharpening feature built-in, you can always download a more advanced photo editor off of the Google Play store.
Note that increasing sharpness can also increase the amount of grain present in the photo. However, this is unlikely to be visible once your profile picture is uploaded to Instagram, since it’s already displaying at a very small size.
What To Do When Downloaded Instagram Profile Pictures Are Blurry
If your issue is in regards to a profile picture that you’ve downloaded from Instagram (and not one you’re trying to upload to your profile), then it’s completely normal for it to appear blurry.
This is because Instagram resizes profile pictures down to 320 x 320 pixels. So, if you download them from Instagram, they will appear at this resolution.
When it comes to photos on a screen, they will always appear to be more blurry the larger they are stretched.
Since 320 x 320 is very low resolution, it’s very normal for them to appear blurry, blocky, or pixelated when viewed.
Unfortunately, there’s nothing that can really be done to fix this. Your choices are either to find a larger copy of the original file, or use an upscaling tool like Topaz Gigapixel AI on the photo.
Conclusion
Although blurry photos can sometimes be caused by a glitch in the uploading process, it’s usually due to a problem with the source photo.
By following the tips mentioned above, you can avoid ending up with blurry photos, and dramatically improve their perceived quality to others.
I hope that you’ve found this article helpful, and your profile picture is now looking great.
If you have any other questions about Instagram, please ask them below and I’ll get back to you as quickly as I can.
Wishing you the best,
– James McAllister
