Censoring audio in Audacity is very simple, and only requires a few moments to do properly.
Whether you’re hoping to avoid marking your podcast episode as ‘explicit’ or you need a radio-friendly version of your song, you’ll want to censor your audio as quickly and as cleanly as possible.
Fortunately, there are a couple of ways to do this in Audacity.
Step One: Create A New Mono Track
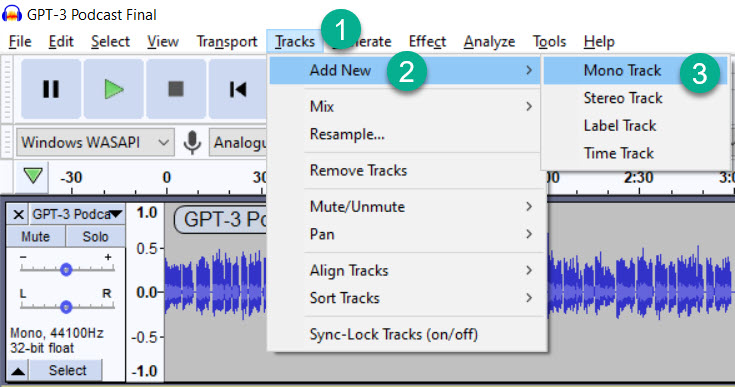
The first way to begin censoring swear words in Audacity is to create a new stereo track.
This can be done by going to the ‘Tracks’ tab in the menu running across the top, hovering over ‘Add New’, and then clicking ‘Mono Track.’
You could also create a stereo track if you’d like, but a mono track is simpler and will help keep the censoring tone even on both the left and right speakers. If you have some setup that has for example, one speaker talking on the left side and one on the right side and you only want to move the censoring tone to only one side, you can still do that on a mono track using the panning options here:
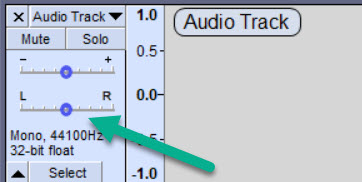
The reason you want to create separate tracks is because it becomes much easier to organize and manage your censor tones when they’re on a separate track.
You can see exactly where they appear, you can pan them left and right, and you can adjust the volume of them separately from your main audio.
Note that if you’re going to be importing your own custom sound effect, you won’t need to create a separate track as it will be done automatically.
Step Two: Silence Or Delete The Swear Word
 The next step is to highlight and remove the swear word from the original audio track. You can zoom in easily on the offending word by holding the Ctrl key (or command on a mac) and using the scroll wheel to zoom in and out.
Note that some people prefer to leave the first and last sound of the word in purposely, so the meaning of the word can still be easily identified by the listener. You’ll need to check with the platform you’re submitting audio to in order to fully comply with their minimum requirements in regards to censoring. Some may allow partial censoring like this, whereas others may be more strict in this regard.
There are two ways I recommend doing this in Audacity.
The first is by using Silence Audio, which can be reached by clicking ‘Edit’, then hovering over ‘Remove Special’ and clicking ‘Silence Audio’. The shortcut for this is Ctrl+L, or Command+L on a Mac. This will take whatever audio is highlighted, and complete silence it.
For censoring, I actually recommend a different option, called Split Delete. This does essentially the same thing – except it deletes the entire section that is highlighted, splitting the audio track into two separate areas. The advantage of this is that you will be able to snap your censoring tone to the exact gap, leading to faster and more precise editing.
Note that you shouldn’t simply delete the audio that you highlight, as this will automatically shift all the remaining audio on that track over, not leaving any gap between it. This will sound unnatural, and may move all other audio on other tracks out of sync. This is why silence or split delete are so useful – they leave the remaining audio right where it is.
Step Three: Add In The Censoring Sound
 The last step is to simply add the censoring sound to the 2nd mono track that you created earlier.
If you have a specific sound effect that you want to use, you can simply drag it in to the timeline and position it where you want it to be using the Time Shift Tool. To add additional censors, you’ll want to highlight and copy and paste the sound effect rather than reimporting it, in order to keep it on the same audio track.
However, if you don’t have a sound effect you’d like to use or you’d like an even simpler way to create a censoring ‘bleep’ or ‘beep’ sound, Audacity has a future built-in that can aid with this.
How To Generate A Tone With Audacity
By using the tone generation option, Audacity will automatically create a tone that can be used to mask undesirable words in your audio.
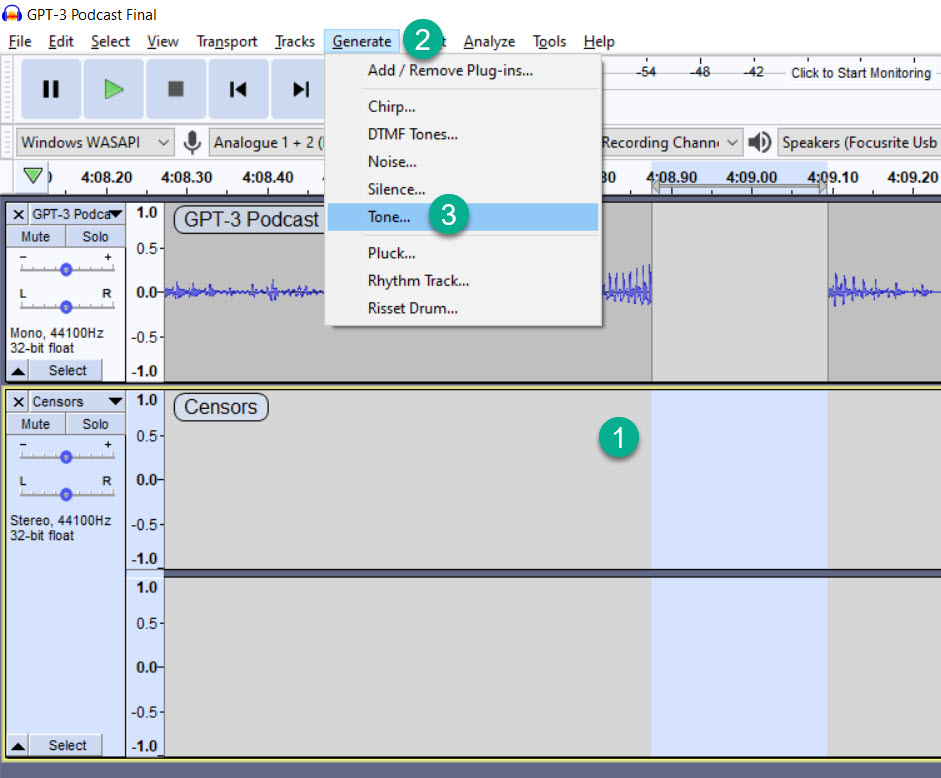
To begin generating a tone, first highlight the space that you want to create the tone for. Make sure you’re highlighting this on your separate track. If you used the ‘Split Delete’ option mentioned earlier, you should be able to snap to the exact points where the audio was cut.
Next, click the ‘Generate’ button up at the top of the software, and then click on tone. You should be greeted with an options menu that looks like this:
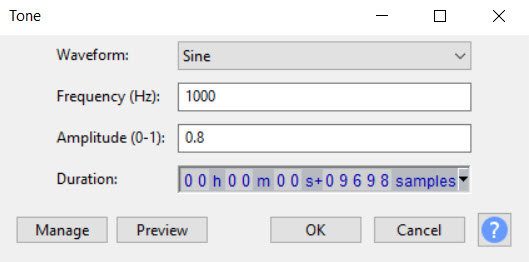
You’ll want to keep the settings as follows:
Waveform: Sine
Frequency: Around 1000. The frequency is the ‘pitch’ of the generated tone. Higher numbers equate to a higher pitch, and lower numbers equate to a lower pitch. You can preview the pitch of the generated tone by clicking the ‘Preview’ button at the bottom left.
Amplitude: This should be somewhere between 0.5 and 0.8. The amplitude is how loud the generated tone can be. You can adjust this using the volume slider on the track, however it will adjust everything on that track. Therefore, it is best to keep these consistent, even if they end up being off – this saves time over having to manually adjust each censor tone individually.
Duration: This is already set if you highlighted the audio as instructed earlier.
Conclusion
Press OK, and there you have it! The tone will be filled in, and the word will have been successfully censored.
All that’s left to do now is listen back a couple of times, and there you go!
