Java used to be a requirement for almost every PC, as so many applications, games, and pieces of software required it in order to run.
These days however, things are different, and Java isn’t quite as popular as it used to be.
So, this can lead you to wonder – is Java still even needed anymore, particularly if you’re running Windows 10 or 11? Or, can you get by just fine without keeping it installed?
In this article, I’ll cover everything that you need to know.
Is Java Necessary On Windows 10?
Java is only necessary if you are using software that relies on it in order to run.
If you aren’t using software, games or applications that require Java, then there is no need to download it to your computer.
While many people used to install Java straight away as soon as they setup a new PC, this isn’t really a requirement in the ‘Windows 10 era.’
Instead, you may simply leave it uninstalled until you actually end up using software that requires you to have it. When this happens, the software will likely notify you that you need to install Java, so you really don’t miss out on anything by waiting to install it until that point.
In a moment, I’ll be going over how you can check if you currently have it installed, what to do immediately if you wish to keep it, and how to uninstall it if you want to get rid of it.
How To Check If Java Is Currently Installed
Currently, there are a few ways to check if Java is installed on Windows 10, or Windows 11

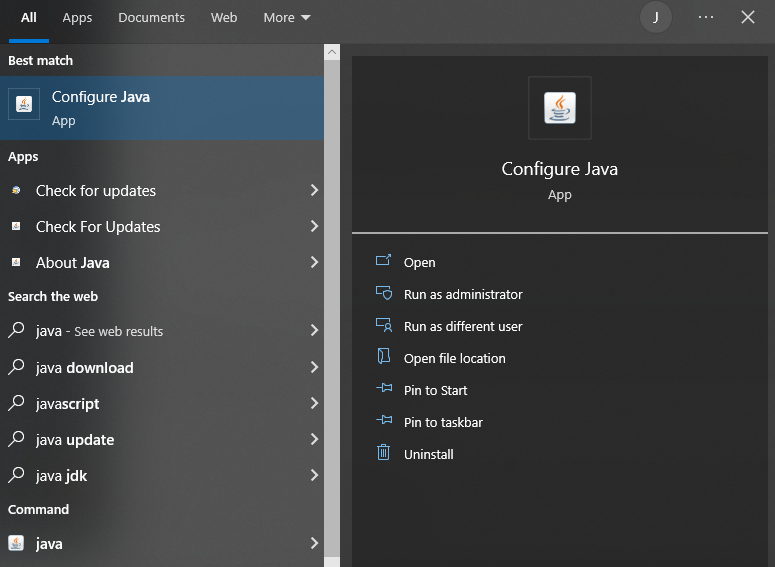
The first is to click on the Windows icon, at the bottom-left corner of your screen.
Then, type ‘Java’ into the search bar.
Under the ‘Best match’ section, you will see a Java app appear there. Additionally, you may see ‘java’ appear underneath the ‘Command’ section as well.
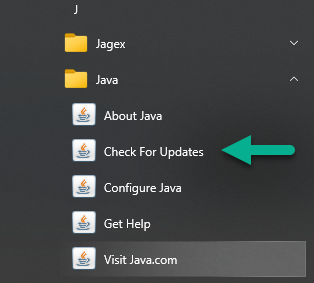
Alternatively, you can scroll down through your list of programs until you get to the ‘J’ section, and then see if a Java folder is there.

Another way to check that Java is installed, is to do it through the Windows command prompt.
To do this, follow these steps:
- Click the Windows icon in the bottom-left corner.
- Type ‘cmd’ into the search bar, and click on the result.
- Type java -version into the box, and press enter.
If Java is installed, you will see a picture similar to the one above, where it shows you your current Java installation and version number.
If you get a message stating, “‘java’ is not recognized as an internal or external command, operable program or batch file.” then you don’t currently have Java installed.
At this point, you have a choice to make – you can either uninstall Java immediately, or if you wish to keep Java, you should immediately check for updates to avoid security issues. Instructions for both will be found below!
How To Uninstall Java

If you no longer wish to have Java installed, uninstalling it is simple, and only takes a few moments.
To uninstall Java from your computer, follow these steps:
- Click the Windows icon in the bottom-left corner.
- Type ‘Control panel’ into the search bar, and click on the result.
- On the window that pops up, click on ‘Uninstall a program’ underneath the ‘Programs’ section.
- Locate Java in your list of programs, and click on it.
- Click on the ‘Uninstall’ button located at the top of the window.
- Follow the on-screen instructions.
If you have multiple versions of Java listed here, you will need to uninstall each one of them before Java is completely removed from your system.
Can Java Be Safely Uninstalled?
When uninstalling a piece of software as large as Java, it can make you worry whether or not it’s safe.
So, what will actually happen if you remove Java from your system?
Truthfully, Java can be safely removed without any issues. The only thing that will happen is that any applications that required Java to run will no longer work, until you reinstall Java once again.
However, it only affects programs that require Java. The rest of your PC will continue to run normally without any issues, and it will not affect Windows at all.
Plus, you’ll stop getting those pesky requests for Java to update, which can constantly bother you if you ignore them!
Nothing about this process is irreversible, and you can always redownload Java from their website at any time.
How To Update Java On Your Windows Computer

If you do decide to keep Java, it’s important that you ensure that you’re keeping up with security updates.
Unfortunately, Java is prone to security issues, and Java is one attack vector used to infect PCs. While this has largely been taken care of (and isn’t nearly as prevalent as it was in the past), Java still pushes out important security updates when exploits become known.
So, by ensuring that your version of Java is up-to-date, you can protect yourself against threats.

To update Java, follow these steps:
- Click the Windows icon in the bottom-left corner.
- Scroll down through your programs until you reach ‘Java.’
- Open the folder, and click on ‘Check for updates.’ This will open the Java Control Panel.
- On the ‘Update’ tab, click on the ‘Update Now’ button on the bottom of the window.
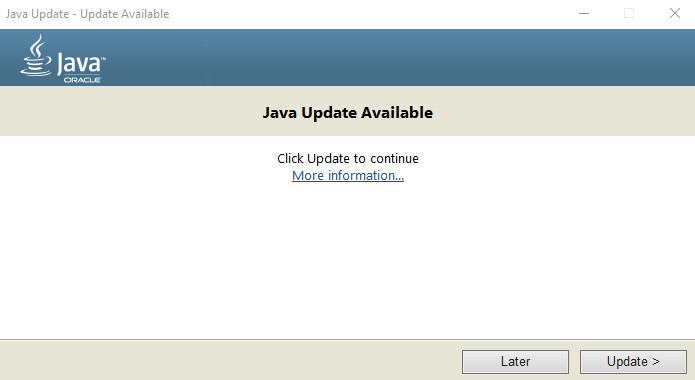
- On the box that pops up, click on ‘Update.’
- Follow the on-screen instructions.
The entire installation process only takes a few moments to complete. Once it’s done, congratulations! You’ll be running the latest, most secure version of Java available.
Conclusion
Because more applications are being developed that aren’t dependent on Java, it isn’t always necessary to keep around.
So, you can safely uninstall Java from your Windows 10 or Windows 11 computer should you wish to do so.
That being said, if you do decide to keep it, it’s important that you install updates as they become available to protect yourself against exploits.
I hope that you’ve found this article helpful, and that it’s answered all of your questions.
If you run into any issues or you have any other questions, please ask them below and I’ll be happy to help.
Wishing you the best,
– James McAllister
