Is your iPad battery draining faster than you feel it should be?
The truth is, iPads are meant to last throughout the day (or even longer) without needing to be charged. So if it appears to be losing charge quickly, this can become concerning.
Thankfully, there is a lot that you can do to dramatically improve the battery life, without needing to get a replacement or spend any money.
In this article, I’ll be going over 14 different ways to improve your iPad battery life, slow the rate in which the battery drains, and increase your iPad’s lifespan.
Let’s get to it!
1. Check Which Apps Are Causing The Problem
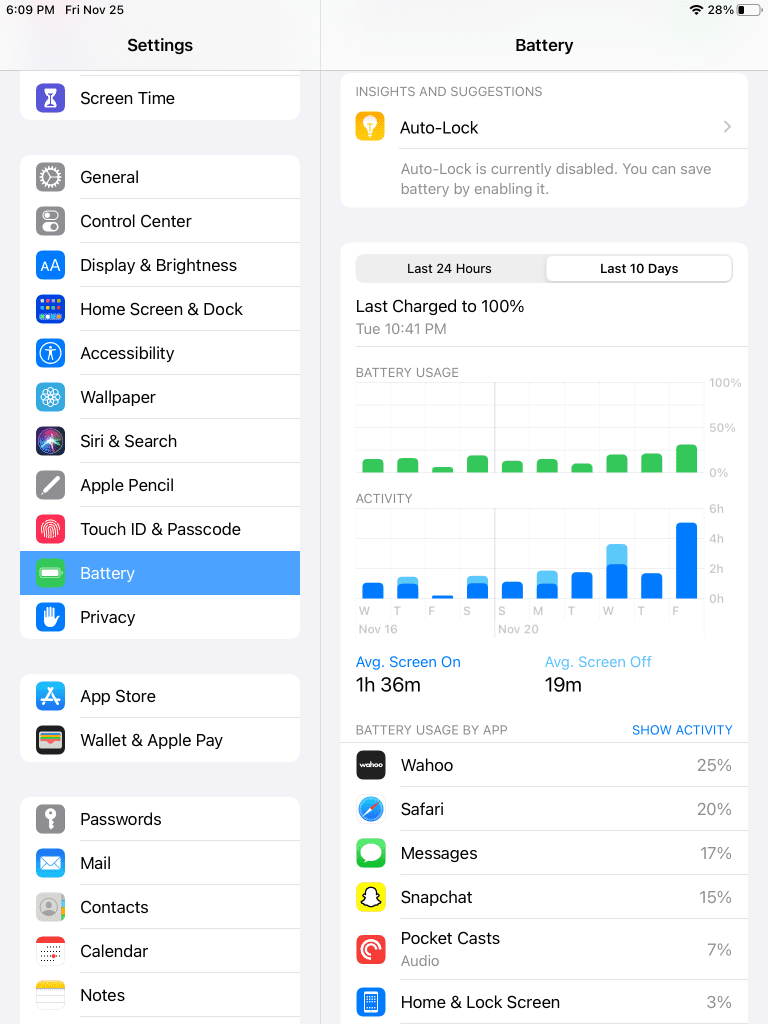
First things first, let’s identify what apps are causing the largest amount of battery drain.
Your iPad actually keeps detailed analytics regarding its battery usage, and this can help you to pinpoint what exactly may be causing the problem.
For example, certain apps may use several times more battery than others, even if they’re used for the same amount of time!
So, to view which apps are using the most of your battery, follow these steps:
- Open the ‘Settings’ app.
- On the left-hand side, tap on ‘Battery.’
- Under the ‘battery usage by app’ section, view the apps using the highest percentage of your battery.
Note that Apple allows you to view battery usage over the last 24 hours, as well as the last 10 days.
If battery drain is a consistent problem for you, looking over the battery usage over the last 10 days may be more helpful.
If you tap on the ‘Show Activity’ button, your iPad will also breakdown the battery usage on when the app was actually open, and when it was running in the background.
If an app is draining a lot of battery in the background, you may consider removing it!
2. Avoid Known Battery Drainers
Did you know that certain apps are known for draining battery more than others?
Generally speaking, the harder your iPad has to work, the more battery it’s going to use. This is because compute-heavy tasks (like rendering video, or using AR apps) for example require a lot of computing power, which has to be delivered by your battery.
While heavy games are obvious battery drainers, one app that’s thought of less frequently is FaceTime – or other video conferencing apps like Zoom or Skype.
When video calling for example, your screen is constantly refreshing, your microphone and camera are in constant use, and you are constantly uploading / downloading large amounts of data.
So, apps like these can drain the battery extremely quickly compared to something like web browsing, or even streaming video on YouTube, Netflix, or other similar services.
Just something to keep in mind!
3. Check Your Overall Battery Health
Unfortunately, iPad batteries degrade over time. And as this happens, your iPad will be able to hold less of a charge – meaning that it ends up draining the battery quicker.
If your battery health is only at 75% for example, your iPad may appear to charge up to 100% – but it only ends up holding 75% as much power as when it was brand new.
So, how do you check your iPad’s battery health?
On iPhone, Apple conveniently shares this with us. On iPad, it’s a little bit harder however (but still possible.)
To do this, follow these steps. Note however that unlike every other method within this article, this one doesn’t work on all iPads. Anyhow, here are the instructions!
- Open the ‘Settings’ app.
- Tap on ‘Privacy.’
- Tap on ‘Analytics & Improvements’
- Tap on ‘Analytics Data.’
- Search for a file that starts with ‘Analytics-Never’, and find the one with the most recent date.
- Within the file, look for a line that says ‘last_value_MaximumCapacityPercent’, and view the number next to it. This is your battery’s maximum capacity, and reflects its overall health.
You can also use the shortcut available on this website.
However, you will need to have analytics sharing turned on for this file to appear!
4. Lower Your Screen Brightness
This one might seem kind of obvious, but it’s important!
Your screen is one of the largest contributors to your battery being used. This is particularly true if you are only using your iPad for ‘light’ tasks, such as browsing the internet, or using social media apps.
So, you can save a lot of battery life by lowering it a bit!
Thankfully, even small reductions in screen brightness can add up to considerable battery savings, especially if you keep the screen on for extended periods of time.
Therefore, it’s definitely worth considering – you may notice that your eyes quickly adjust, and the slightly darker screen isn’t all that bad!
5. Update To The Latest Version Of iOS
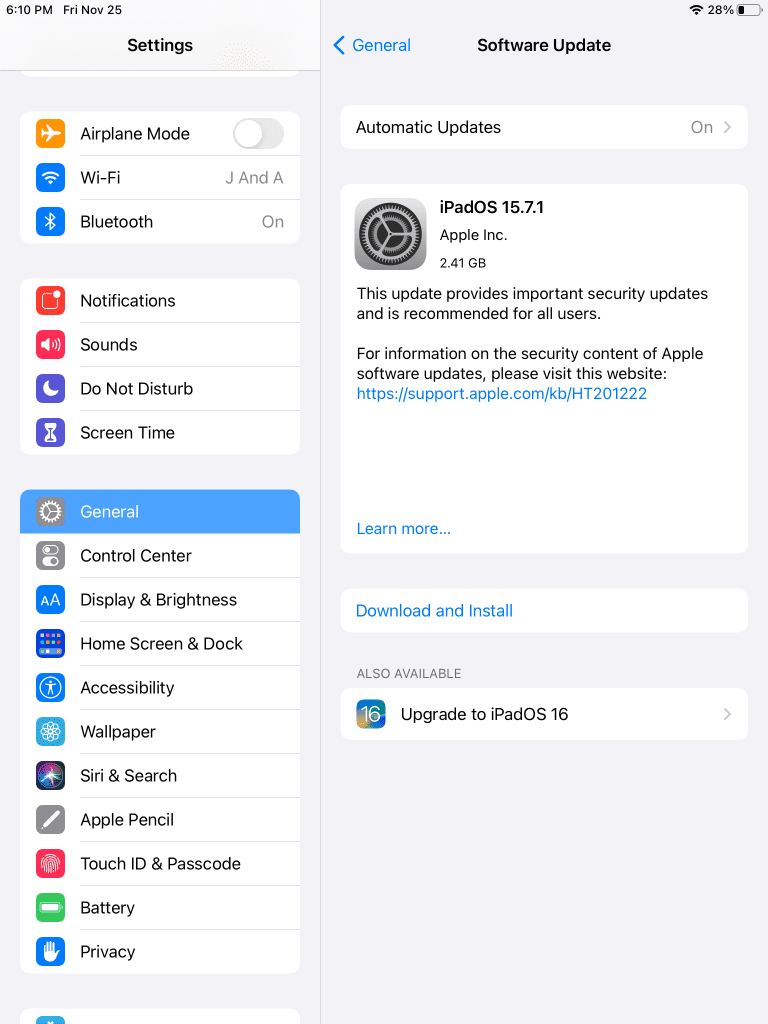
This one is important, and can immediately solve your battery issues.
Unfortunately, iOS occasionally experiences bugs, and the battery seems to be one area that is most affected.
Additionally, it can be hard to know whether or not it’s a software bug that’s causing the battery drain issues.
Because Apple is great at fixing bugs shortly after discovering them, the issue is likely already resolved if it affected a large number of people.
So, consider checking for iOS or iPadOS updates by following these instructions:
- Open the ‘Settings’ app.
- On the left-hand side, tap on ‘General.’
- Tap on ‘Software Update.’
If an update is available, you can install it by tapping on the ‘Download and Install’ button that will appear on the screen.
Note however that if the battery issue is sudden and you haven’t recently updated your iPad, this likely isn’t the issue.
In fact, if you haven’t updated in a long time and you are using an iPad that is several generations old, updating the OS can actually make your battery drain faster, due to modern versions of iOS / iPadOS being more demanding than they were in the past.
6. Disable Background App Refresh
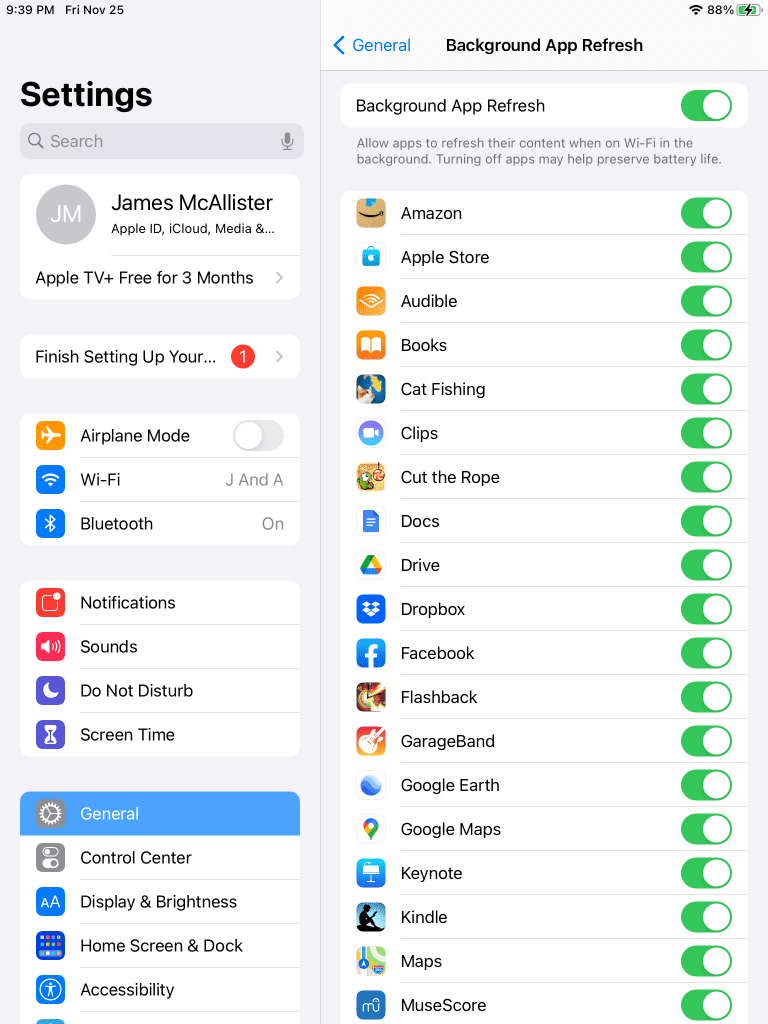
Every little thing that runs in the background, will contribute to your iPad’s battery drain to a certain degree.
So, if you have lots of apps that work in the background even when you’re not using them, this can quickly add up to a lot of additional work for your iPad – resulting in the battery draining faster, even when you’re not using it!
Thankfully, Apple allows you to disable specific apps from doing things in the background when they’re not being used. This setting is called ‘background app refresh’, and it’s easy to make changes to.
Note that some functionality may be lost when disabling background app refresh, due to the way it works.
Essentially, background app refresh allows apps to make changes in the background, even when they’re not being used.
For example, let’s say you had an app that shows the news. With background app refresh enabled, the app could pull the latest headlines, so when you open the app, they’re already there for you.
Unfortunately, these types of things can take a lot of battery, especially with dozens or even hundreds of apps installed.
To disable background app refresh on certain apps, follow these steps:
- Open the ‘Settings’ app.
- Tap on ‘General.’
- Tap on ‘Background App Refresh.’
- Toggle background app refresh off for any apps that you want to disable it on.
At the very least, this should be done for apps you rarely use.
Disabling background app refresh may require apps to refresh themselves once they’re actually open, but this doesn’t actually hurt their functionality in any way – it may just cause them to appear slower when you first open them.
Additionally, it should be noted that disabling background app refresh will not affect notifications either – so don’t worry about missing out on them!
7. Turn On Auto-Lock
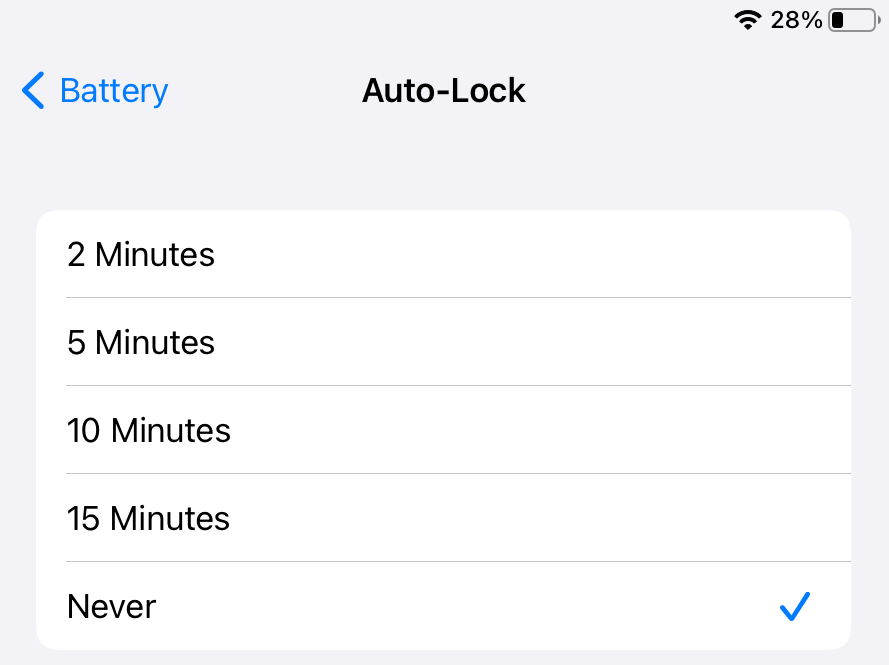
If you don’t have auto-lock turned on for your iPad, it may be a good idea to enable it!
Auto-lock automatically turns the screen off if you haven’t used the iPad for a certain period of time. This not only saves battery, but also acts as an additional security benefit, as the iPad will need to be unlocked again before its used.
Auto-lock can be set from 2 minutes to 15 minutes, which can save your battery if you walk away from your iPad without locking it, for example.
After all, it would sure be a shame if your iPad discharged completely, because the screen was on overnight!
To turn on auto-lock, follow these steps:
- Open the ‘Settings’ app.
- Tap on ‘Display & Brightness.’
- Tap on ‘Auto-Lock.’
- Choose the amount of time you want to wait without activity, before the screen locks automatically.
Once you choose an option, you’re all set!
Of course, if you already have auto-lock enabled, you can save additional battery by setting it to a shorter time.
8. Change Email From ‘Push’ To ‘Fetch’
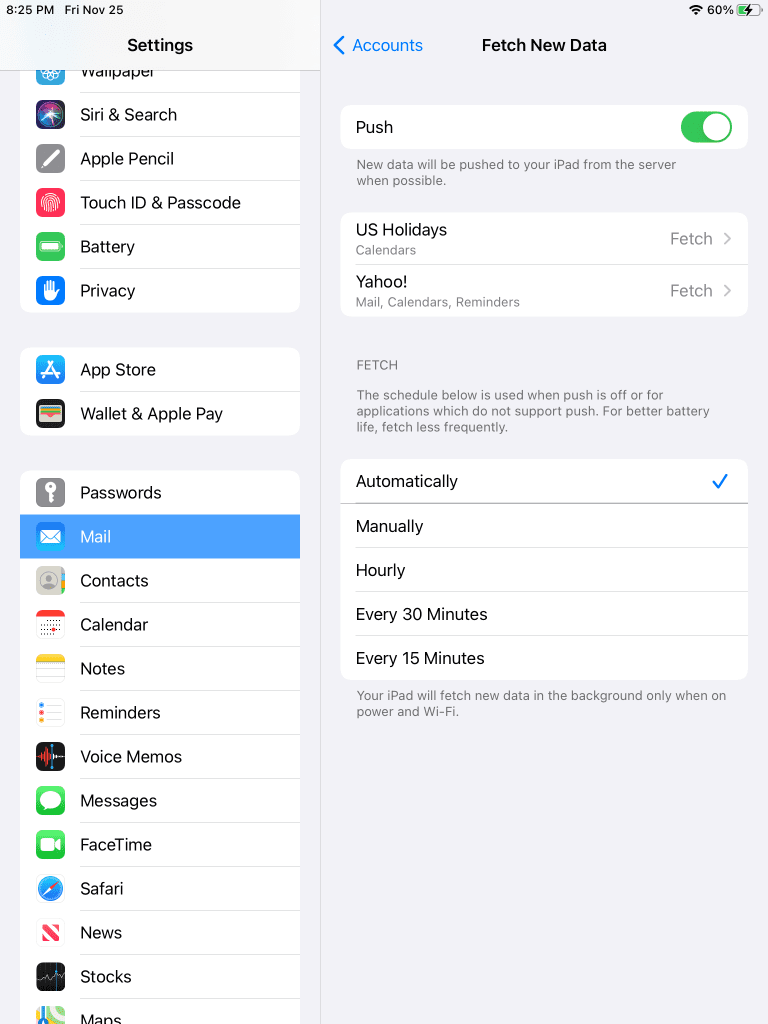
If you have the Mail app set up on your iPad and you receive a lot of email, this can dramatically impact your battery life!
This is because your iPad will be constantly checking for new emails coming in, on all of the accounts that you set up.
Thankfully, you can disable this and have your iPad check for mail far less frequently with a simple setting change!
To do this, you’ll want to change the mail setting from ‘push’ to ‘fetch’, and then set a fetch frequency that is much lower – such as once every 15 minutes, or once every hour.
To update your mail settings, follow these steps:
- Open the ‘Settings’ app.
- On the left-hand side, scroll down and tap on ‘Mail.’
- Tap on ‘Accounts.’
- Tap on ‘Fetch New Data.’
- Toggle ‘Push’ off.
- Under the ‘Fetch’ section, toggle it from ‘Automatically’ to a frequency of your choosing.
‘Every’15 minutes still saves a lot of battery life, and is still quite frequent – so choose a setting that you’re comfortable with!
9. Disable Widgets That Aren’t Important
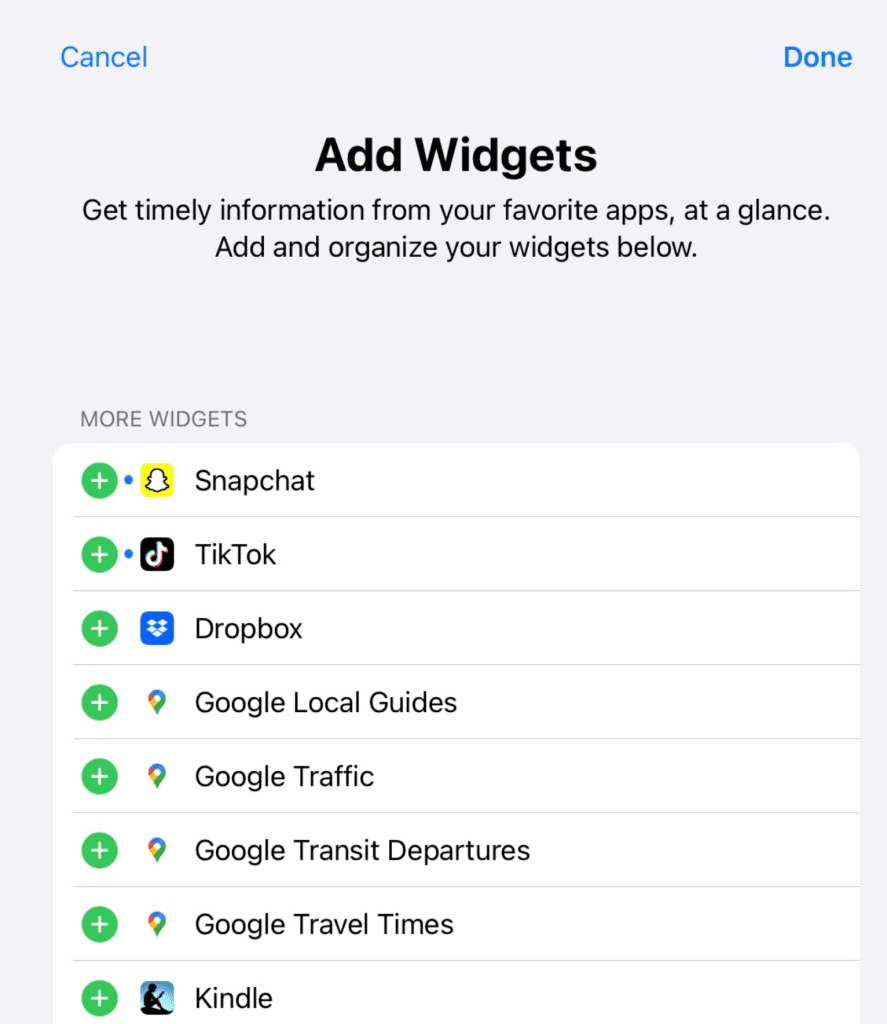
Like your mail, widgets also continuously run in the background, fetching new data to ensure they’re already loaded and accurate by the time you browse them.
So, if you don’t actually use them all that much, you can disable certain widgets without actually losing anything useful – but helping your battery out in the process!
To disable widgets, all you’ve got to do is scroll all the way to the left from the iPad’s app page, until you reach the page with all the widgets.
Then, tap on the ‘Edit’ button beneath the widget you want to remove, and tap once more on ‘Customize.’
From there, you’ll see a list of widgets that you have available. Tap on the red button next to the widget that you want to remove, and it will be disabled.
Finally, tap on the ‘Done’ button in the top-right corner, and that widget will no longer be draining your battery!
10. Disable Analytics Sharing With Apple
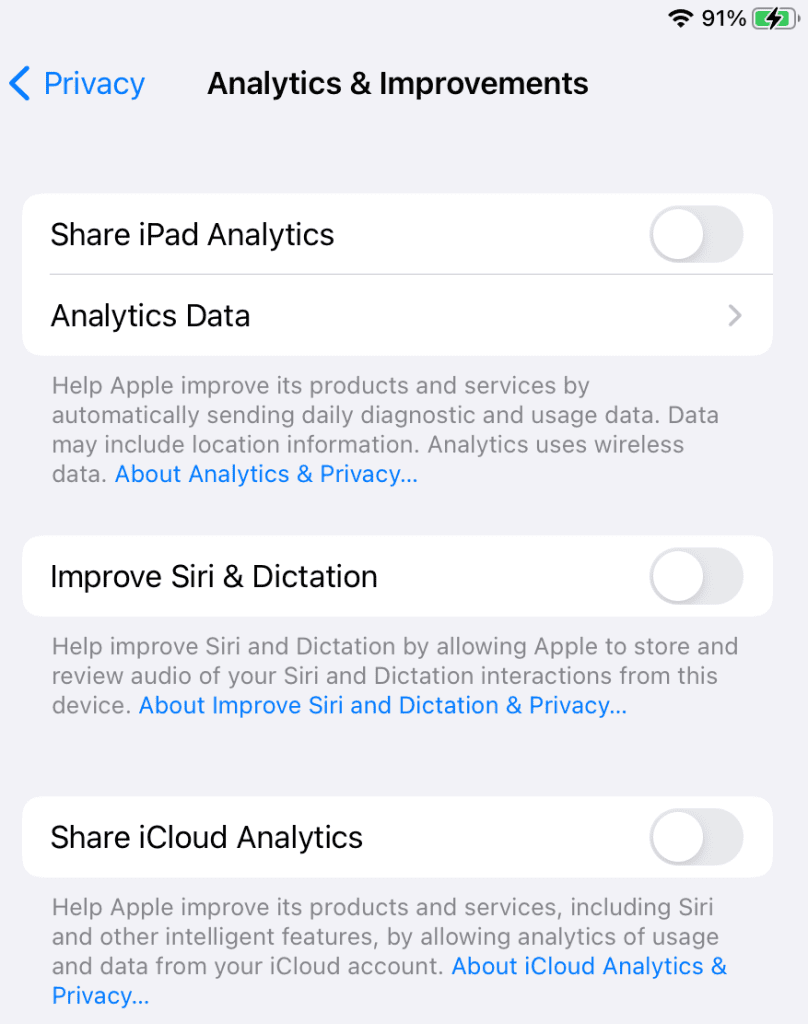
You may have noticed a pattern by now – a lot of what we’re doing is disabling things that run in the background, but don’t actually help your experience at all.
This one is no exception!
When you have analytics sharing enabled, analytics files are regularly generated and sent to Apple.
While Apple claims these files help them, they really offer no practical benefit to you, and may even cause privacy concerns.
So, unless you really want to keep them, it’s recommended you turn them off!
You can disable analytics sharing with Apple by following these steps:
- Open the ‘Settings’ app.
- On the left-hand menu, tap on ‘Privacy.’
- Tap on ‘Analytics & Improvements.’
- Toggle ‘Share iPad Analytics’ off.
This improvement may not be significant on its own, but everything helps!
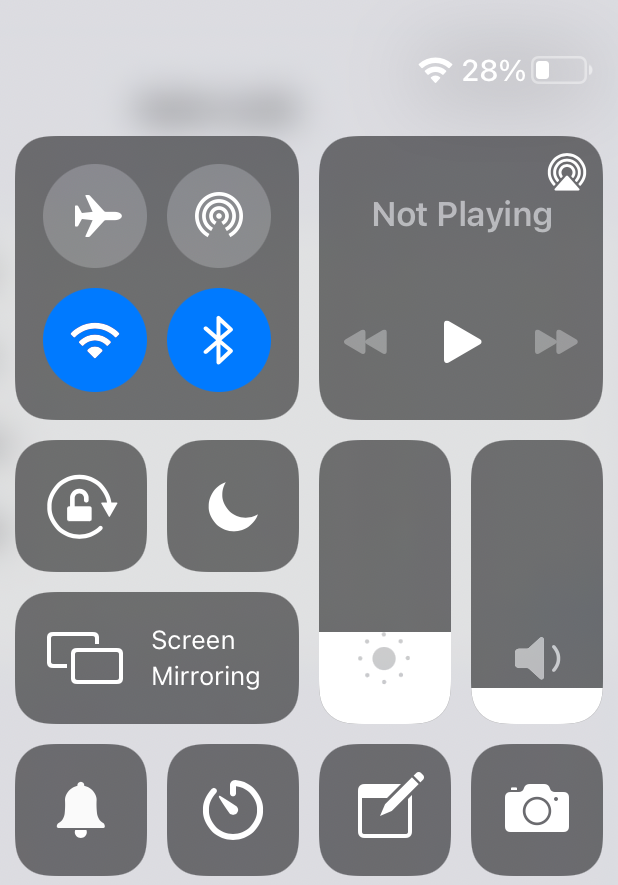
11. Disable Services You’re Not Using
If there are certain functions of your iPad that you’re not using, it’s a good idea to turn them off if your goal is to preserve battery.
For example, if you aren’t using Bluetooth, there is no reason to keep it on. Same thing with Wi-Fi if you’re not actually going to be connecting to a Wi-Fi network anytime soon.
This is because these services are still on, actively scanning for potential devices or networks to connect to – which uses battery life.
Location services is the same way – if you aren’t doing something that needs your location, there is little point in having location services turned on (which keeps your GPS active.)
If you simply use your iPad at home, you may even consider turning airplane mode on.
Airplane mode shuts off all incoming and outgoing connections, but can still be used with Wi-Fi if you wish (just turn Wi-Fi back on after airplane mode has been enabled.)
This can dramatically improve your iPad’s battery life!
Note: If you are using an iPad with cellular capabilities, consider disabling mobile data when it’s not in use as well. Connecting to the internet via Wi-Fi uses less battery than mobile data does, so it’s a good habit to get into!
12. Utilize Low Power Mode More Frequently
If your iPad is running iPadOS and has low power mode available on it, you can save battery life by turning it on as frequently as possible.
Low power mode does a lot to improve and extend the battery life, and lower the rate in which the battery drains.
For example, low power mode turns autolock to 30 seconds, lowers the screen brightness, disables automatic downloads, and shuts off a lot of things that run in the background, but use a lot of battery.
While it’s not meant to be a permanent solution, it can extend your battery life quite a bit in a pinch.
So, whenever you’re worried about your battery life and low power mode’s features don’t bother you, consider turning it on! There is no harm with running it frequently, after all.
13. Consider Factory Resetting Your iPad
One drastic solution – but one that’s often able to dramatically help, is to factory reset your iPad.
This will erase everything on the device, and restore it back to its original settings.
If there is a software glitch that’s affecting your battery life, resetting your iPad to factory settings can often fix it. This is because it essentially restores it to its like-new settings, deletes your apps, and removes a lot of things that would use up battery in the background.
Note that you’ll want to make a backup of important files to iCloud before resetting your iPad, as they may be permanently lost if no backup is made.
Again, this is a drastic fix, and often isn’t necessary if you’ve already followed the other fixes mentioned in this article.
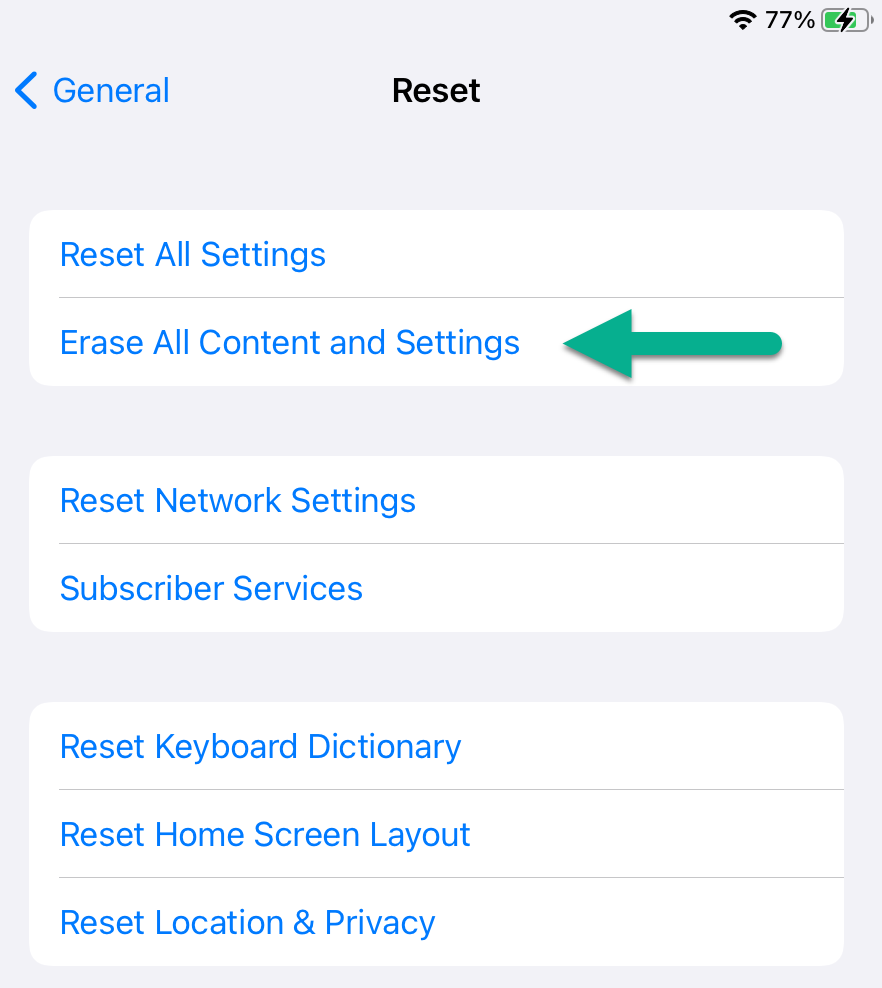
If you’d still like to factory reset your iPad however, you can do it by following these instructions:
- Open the ‘Settings’ app.
- Tap on ‘General.’
- Towards the bottom of the window, tap on ‘Reset.’
- Tap on ‘Erase All Content and Settings.’
- Follow the on-screen instructions
14. Keep Your Device Within The Ideal Battery Range
This one won’t help your battery last longer right now, but it will protect your battery’s health in the future – ensuring that it stays near the same capacity, for longer periods of time.
As mentioned earlier, batteries degrade over time, and as time goes on, they will not be able to hold as much of a charge as they would previously.
However, you can help your battery out by keeping it within the ideal battery range while you use it.
Many people don’t know this, but it’s actually harmful to the battery to let your iPad completely hit zero, and charge it all the way up to 100% as well.
In fact, Apple will actually slow the charging of your iPad once it gets past 80%, charging it more slowly until it gets to 100%.
Ideally, keeping your iPad battery above 20%, and above 80% has been proven to be best for its long-term health.
15. Consider Purchasing A Battery Replacement
Finally, if your iPad continues to give you battery problems after implementing these fixes, it may be time to have your iPad battery replaced.
This costs significantly less than replacing your iPad, and in may cases, the battery may be the only thing wrong with it!
To have Apple replace the battery themselves, the service typically costs a little over $100.
However, DIY repair kits or local shops may be able to replace your battery for an even cheaper price – $50 or less, in fact!
After replacing your battery with a brand new one, you should see an immediate improvement in your iPad’s battery life, which should stop it from draining as quickly as it has been!
Conclusion
If your iPad is losing charge fast, don’t worry.
There’s a lot you can do to improve the battery life, and many of these fixes take just a few moments to implement.
I hope that you’ve found this article helpful, and you’ve already managed to implement some of the solutions. You should see improvements to the battery life immediately, so it will hold a charge a lot longer!
If you have any other questions about iPads, please ask them below and I’ll get back to you as soon as I can.
Wishing you the best,
– James McAllister
